
Working with Graphics in PageMaker – Working with Independent Graphics
Working with Independent Graphics
Independent graphics are simply placed on the page. Regardless of what you do around the graphic, the placement will not change unless you move it.
 Placing Independent Graphics
How you place a graphic is initially determined by your choice of either the Pointer tool or the Text tool. Independent graphics are placed using the Pointer tool. If you have the Text tool selected, you can still place the graphic as an independent graphic by making the appropriate selection in the Place dialog box.
-
From the Toolbox, select the Pointer tool

-
From the File menu, select Place…
The Place dialog box appears. -
Select the image file you want to place
-
In the Place section of the dialog box, verify that the graphic will be placed as independent graphic
If that option is not selected, select it now.
-
Windows: Click OPEN
Macintosh: Click OK
Your cursor will change to a graphics icon
-
Use the mouse to position the icon’s top left edge where the top left corner of the graphic should appear in the document
-
Click to place the graphic
-
Select your Text Wrap option
See Using Text Wrap. -
Click OK
Inserting Clip Art from the Microsoft Clip Gallery
Images from the Clip Gallery are placed as independent graphics regardless of whether you use the Pointer tool or the Text tool when inserting them.
NOTE: This feature may not be available on all computers.
-
From the Edit menu, select Insert Object…
The Insert Object dialog box opens.
Windows: Create New should be selected.
Macintosh: New should be selected. -
From the Object Type list, select Microsoft Clip Gallery
-
Click OK
The Microsoft Clip Gallery opens. -
Select an image
-
Click INSERT
The image appears on your page. You may resize, move, crop, layer or wrap text around it.
Sizing Independent Graphics
Once you have placed a graphic in your PageMaker document, you may discover that it is not the right size or it contains extra information that is not relevant to your document. With PageMaker’s ability to resize and crop graphics, you can make adjustments to the graphic so it better meets your needs. If you need to do additional editing, you probably need to use a graphics program such as Adobe Illustrator.
The following instructions cover how to reduce, enlarge, stretch, or crop part of a graphic.
Stretching or Shrinking a Graphic
-
Using the Pointer tool, select the graphic you want to alter
-
To change your image proportionately, click and drag one of the corner selection handles
OR
To change your image in height or width, click and drag one of the top, bottom, or side selection handles
HINT: To modify the object incrementally by .1 inch, hold the [Shift] key while dragging. -
Release the mouse button
Cropping Independent Graphics
Placing graphics often creates unnecessary white space along the sides of the image. You may also find that you only need a portion of a graphic. The Cropping tool functions somewhat like a scissors, cutting off the parts of the graphic you do not need or want.
-
From the Toolbox, select the Cropping tool

-
Select the image you want to crop
-
To crop part of the image, click a handle and drag it inward
You should be able to see the handle through the center of the Cropping tool when you click on a handle for cropping.
-
Release the mouse when the graphic is cropped correctly
HINT: If you decide later not to change the cropping, you can select the graphic with the Cropping tool and enlarge the frame to show more of the graphic or the entire graphic.
Panning Graphics
Panning a graphic allows you to adjust the portion of the image that is displayed after it has been cropped.
-
From the Toolbox, select the Cropping tool
-
Select the image you want to pan
-
Position the Cropping tool in the center of the graphic
-
Click and hold the mouse button
A small Hand icon will appear in the graphic.
-
Hold the mouse button down and move the Hand icon within the graphic until the image is where you want it
-
Release the mouse button
Moving Graphics
If your graphic is not placed in quite the right spot on the page, it can be moved.
To move an independent graphic:
-
From the Toolbox, select the Pointer tool
-
Select the graphic you want to move
-
Click and hold anywhere on the graphic except on a handle
WARNING: If a two-sided arrow appears you may have grabbed a handle and accidentally resized the graphic. To undo any resizing, release the mouse button and from the Edit menu, select Undo Stretch. -
Still holding the mouse button, drag the element to its new location and release the button
NOTE: If you have selected an in-line graphic, you will not be able to move it more than a few pixels up or down within the text. If you click on an in-line graphic and try to move it, you will see this arrow ![]() .
.
Cutting and Pasting Independent Graphics
To cut and paste or copy and paste a line, a graphic, or a block of text:
-
From the Toolbox, select the Pointer tool
-
Select the graphic elements that you want to Copy or Cut
-
From the Edit menu, select Copy or Cut
-
To paste the item(s), from the Edit menu, select Paste
WARNING: The computer will retain only one cut or copy at a time. If you select Cut and then highlight another item or items and select Cut or Copy, the first item or group of items will be replaced in memory by the second group and can no longer be pasted.
Layering of Graphics and Text
As you add more graphic elements and text to your document, the order that they appear on the page can make a difference on how the page looks. For example, if you have a shaded box and text in the same area of the page, the text has to be on top of the box in order for you to be able to read the text. So you do not have to create the graphics and text in the order that you want them to appear, PageMaker allows you to order the layers by sending them either to the front or to the back. To do this:
-
With the Pointer tool, select the desired graphic or text block
-
From the Element menu, select Arrange
-
From the Arrange submenu, select Send to Back or Bring to Front
Selecting Text or Graphics behind Another Layer
To select text or graphics which are not on top
-
Press [CTRL] and click the object
Using Text Wrap

To use text wrap
-
Select the graphic or drawing with the Pointer tool
-
From the Element menu select Text Wrap…
The Text Wrap dialog box appears.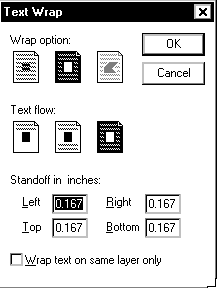
-
Select the appropriate Wrap option:
- no wrap
- wrap around square
- wrap around non-standard shape
-
Select the appropriate Text Flow option:
- above only
- above and below
- all around
-
Type the standoff (the distance from surrounding text) in inches for each side of the graphic
-
When settings and measurements are correct, click OK
To remove text wrapping
-
Select the graphic or drawing with the Pointer tool
-
From the Element menu select Text Wrap…
The Text Wrap dialog box appears on the screen. -
Select no wrap

-
Click OK
Comments