
Automating Your Work – PageMaker Styles
PageMaker Styles
A style is simply a definition of the type, paragraph, tab, and hyphenation settings for a specific type of text in your document.
Styles are helpful for documents that have several formatting changes (e.g., titles, section headings, text, lists) and for projects that more than one person is working on. Styles can make documents more consistent and they will save you time (especially if you decide to make global changes to your document).
You are already familiar with much of the work that goes into creating styles because you know how to define your type specifications. There are two basic steps to working with styles:
- Define the style
- Apply the style
As with most programs, planning ahead and thinking about your document can save you a lot of time when creating and modifying your styles. This document contains the following sections:
- Creating a Style
- Applying a Style
- Editing a Style
 Creating a Style
You have several options while creating a style. For example, you can define a new style based on an already existing one and/or work ahead by choosing a style for the paragraph following the newly created one.
-
From the Type menu, select Define Styles…
The Define Styles dialog box appears.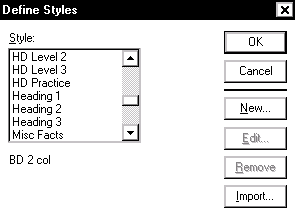

-
Click NEW…
The Style Options dialog box appears.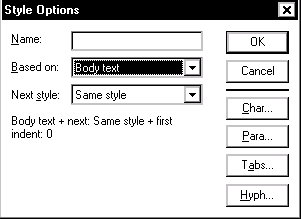
-
In the Name box, type a name for your new style
-
OPTIONAL: To define a new style based on an already existing one, from the Based on pull-down listing, select the desired existing style
If you like everything about a style except the tab stops, you can change the tabs and give the style a new name – everything else will remain the same. -
OPTIONAL: To select a style for the paragraph following the newly created paragraph style, from the Next style pull-down listing, make the desired selection
-
Define the style by making the appropriate changes through the following buttons:
CHAR…
Used to define the type specifications including font, type size, leading and enhancements (e.g., boldfacing).
PARA…
Used to define the paragraph specifications including paragraph margins, space between paragraphs, widow/orphan control and page/column break control.
TABS
Used to define the tab settings.
HYPH…
Used to turn hyphenation on and off and for controlling the hyphenation process. -
To close the Style Options dialog box, click OK
-
To close the Define Style dialog box, click OK
<Applying a Style
Applied styles will affect the text from paragraph return to paragraph return. To apply a style for one complete paragraph, you need to place your insertion point within the paragraph. When you want to apply a style to multiple paragraphs at once, you must select at least one character from each paragraph.
Applying a Style Using the Menu
-
Place the insertion point within or highlight the paragraph you want to apply the style to
-
Windows: From the Type menu, select Type Style » select the appropriate style
Macintosh: From the Type menu, select Style » select the appropriate style
Applying a Style Using the Style Palette
-
If necessary, to display the Style Palette, from the Window menu, select Show Styles
The Style Palette appears.
-
Place the insertion point within or highlight the paragraph you want to apply the style to
-
From the Style Palette, select the appropriate style
Editing a Style
You may decide later that the specifications originally set for a style are not what you want. You can edit the style so that the change you make occurs for every instance of that style in your document.
-
From the Type menu, select Define Styles…
-
From the list of style names, select the style that you want to edit
-
Click EDIT
-
Make the appropriate changes using the TYPE, PARAGRAPH, TABS, and HYPHENATION buttons
-
To close the Style Options dialog box, click OK
-
To close the Define Style dialog box, click OK
Comments