
Animation Killer Tips for Flash MX 2004 – Prebuilt Animations
Prebuilt Animations
There are a lot of Flash programs out there that have built-in animations and are designed solely to let people animate things without needing to really know how a Flash Timeline works. Well, guess what? Go ahead, guess. Okay, I’ll tell you. Flash now has its own built-in Animations, referred to as Timeline Effects. It’s as simple as can be to apply one. Right-click on any object (shape, symbol, and so on) on your Stage and go to Timeline Effects, which will display a list of prebuilt effects for you to choose from. Picking any effect will usually bring up a quick little settings window that enables you to specify parameters for the effect. Once you think you have what you want, click OK and Flash does all the work for you. After an effect has been applied, you can easily change it or remove it by selecting Edit or Remove Effect from the same place you picked the effect itself, after right-clicking the object with the effect applied, of course.
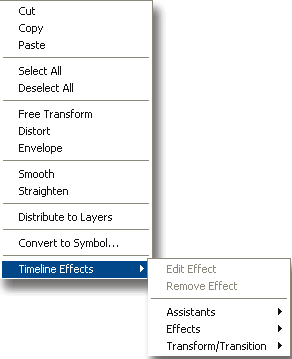
Figure 1A. Navigating to Timeline Effects settings through an object’s context menu

Figure 1B. Applying Timeline Effects
Guiding a Mask or Masking a Guide
Although creating Motion Guides and Masks can be relatively straightforward, what may not be is how to combine the two effects. Let’s say you want to apply a mask to some objects that are part of a Motion Guide. At first you may consider moving your guided layers under your Mask layer, but that will just disable one or the other and make your guided layers masked. Instead, try placing your Mask effect in a movie clip that you create in your Library. Put only your mask and masked layers in the movie clip, and when you have it just the way you want it, you can switch to the Timeline where the guide is or create a guide if one does not exist. Now place your newly created symbol containing your Mask effect on a layer under your guide, attach it to the guide path, set that layer to be guided, and vóila! You can now effectively guide a mask. Of course, the same process works in the other direction when masking a guide, but it can require some more time to make sure that your guided animation is fully visible through the area you defined as your mask.

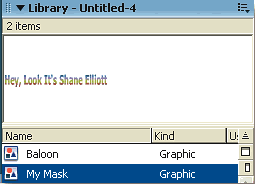
Figure 2A. Library panel with a mask symbol
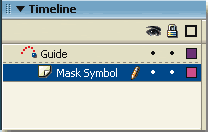
Figure 2B. Timeline with a mask symbol layer under a guide layer
Text That Morphs
You can use a Shape Tween when you want to move a shape across the Stage or to change a circle into a square. However, you can’t apply a Shape Tween to text fields and have them morph from one word to another. Can you? Actually you can, but there are a few steps involved in doing so. As you may or may not know, a text field is not a shape, it’s an object, and objects respond to Motion Tweens, not Shape Tweens, so it’s time to be clever.
Add some text to the first frame of your Timeline. Now add a keyframe to frame 20 and change the text there to something different from what’s on frame 1. Now (with the text field selected) press CTRL-B to Break Apart the text field. At first it will separate the word into individual letter blocks. Press CTRL-B again to break those letters into shapes. Repeat that step for the text on frame 1.
Finally create a Shape Tween to animate between the two keyframes. There it is, a neat little text effect commonly referred to as morphing.
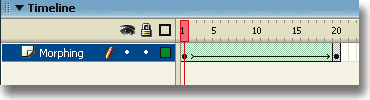
Figure 3A. Corresponding Timeline
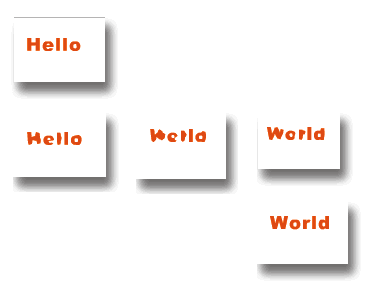
Figure 3B. Morphed text
Realistic Motion
One of the hardest things to do in animation is recreate a realistic movement that you might see in real life. Create a circle, convert it to a symbol, and then create a quick animation using a Motion Tween so that the circle moves up and then back down to its original position (similar to the motion of a ball bouncing). Select any frame in the first Motion Tween, go to the Property inspector, and set the numeric Ease value to 100. Now select any frame in the second Motion Tween and set its Ease value to -100. Play your animation again and you will see that the animation looks very much like a real ball being thrown up into the air.
Any negative number is for easing in, meaning the animation will begin slow and speed up, while a positive value means the opposite. You can also use the slider to change the Ease value instead of typing it in.
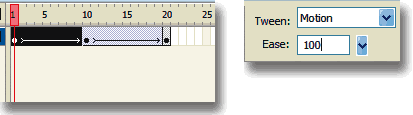
Figure 4A. Timeline for bouncing ball
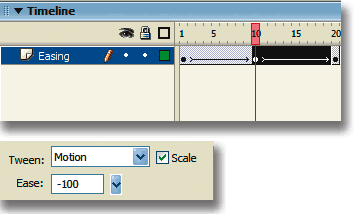
Figure 4B. Setting Ease values
Comments