
Christmas tree design
Design a Christmas card with fir tree using Photoshop techniques and trick.
Final Image Preview

Open a new file that would have 1000×480 px and 72 dpi. Apply the indicated parameters next table.

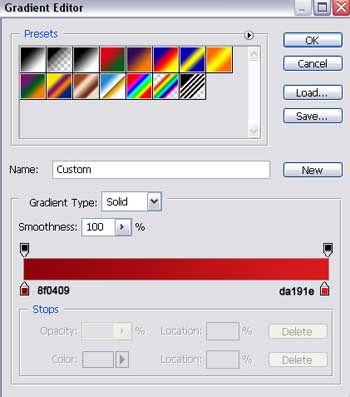
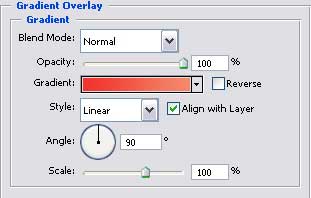
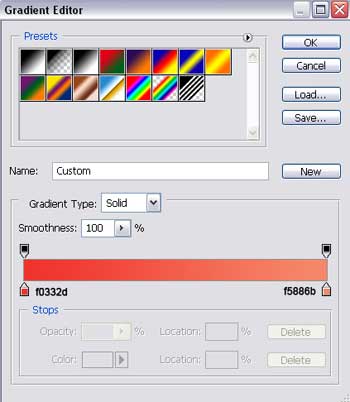
Blending Options-Gradient Overlay
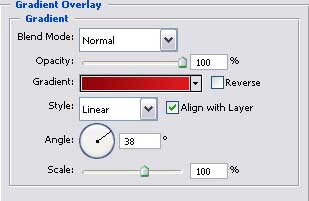
Gradient’s parameters.

Having the next instrument  , it’s possible to represent several figures colored in ED1B24.

All figures have the same color (apply the method of creating and copying the basic figure’s layer). Next combination Free Transform is helpful in turning it around and placing like the next picture demonstrates it.
For your convenience, merge down all the layers now, containing the lines in a group. Copy the new made group and place it the same way like in the next image.

Using the same instrument, create one more figure, colored in EF1B27.

Then apply the following instrument to create an element colored in C3141B.
Take the last instrument to picture another figure colored with a different color – 7D0101.

Take the previous instrument again and insert a new picture of white color, like next image shows it.

 Get the indicated tool to picture another element that must have the same parameters from below.

Blending Options-Gradient Overlay
Gradient’s parameters.
Copy the new made layer 10 times, but remove the effect in the copied layers. Free Transform option is helpful in minimizing them. Place everything the same way form below. Set the color F68567.

Get Free Transform option again to make the necessary changes and don’t forget to place everything like in the next picture. Set the color F89A80.

Apply again Free Transform option to make the necessary changes, but the color must be this time F9B8A2

Use Free Transform option to minimize, change and place everything out like it is shown below, the color is FAC6B1
 Merge now all the layers, representing the fir-tree’s silhouette in a group. Hide temporarily the group on the layers.
Take the indicated tool now to represent a figure colored in AF1015.


Hide this layer provisionally.
Apply now Free Transform selection to change the rest of the copied layers. The next layer must be changed and placed out, exactly the way next image indicates it. Set the color E21B22.

Show again the hidden layer before.

Change the rest of the copied layers and apply Free Transform option to make the necessary changes. Set the color E21B22.

Apply Free Transform again to change all that is necessary and set the same color.

Free Transform option and introduce the same color.

Demonstrate again the hidden group and place it above the new made one.

Page: 1 2
Comments