Colorful Abstract DNA background via Custom shapes in Adobe Photoshop CS3
August 12th, 2008 by ART-D Posted in Adobe Photoshop, Designing
Today, I’m going to show you how to create colorful abstract DNA background via Custom shapes in Adobe Photoshop CS3. Layered PSD file included. Let’s get started!
Final Image Preview

Start working by creating a new document (Ctrl+N) in Adobe Photoshop with the size 1280px by 1024px (RGB color mode) at a resolution of 72 pixels/inch. Use the Paint Bucket Tool (G) to fill with #2A0900 color the new background layer.

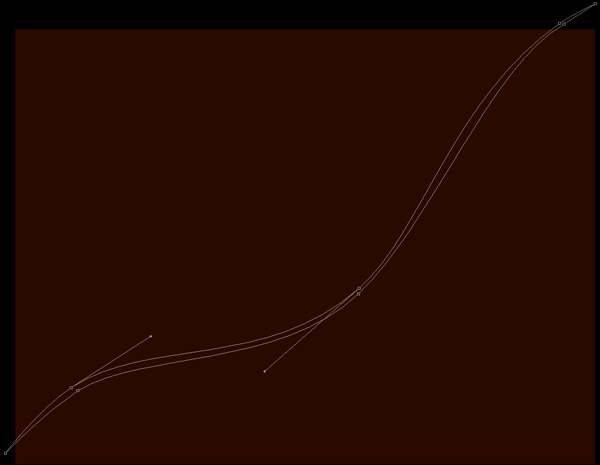
Choose the Pen Tool (P), set the drawing mode on Shape Layers in Options bar and draw the wavy line as shown.

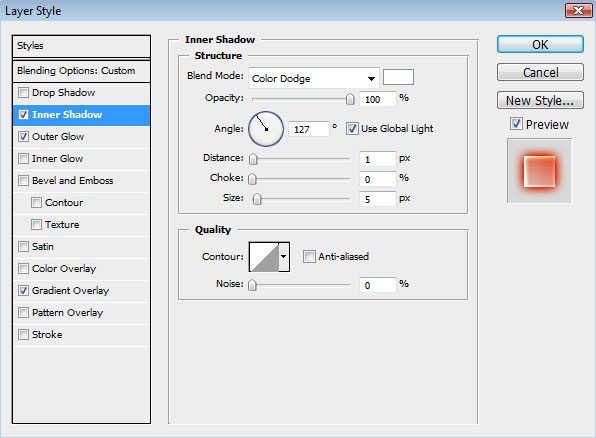
Set Fill to 24% for this layer and click on Add a layer style icon from bottom part of the Layers panel to Inner Shadow.
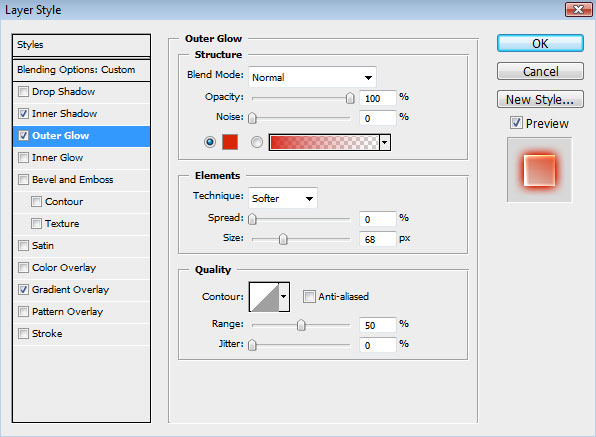
Add Outer Glow:

Apply Gradient Overlay:

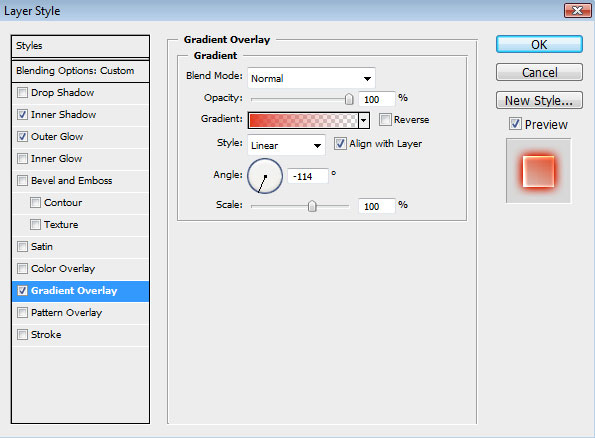
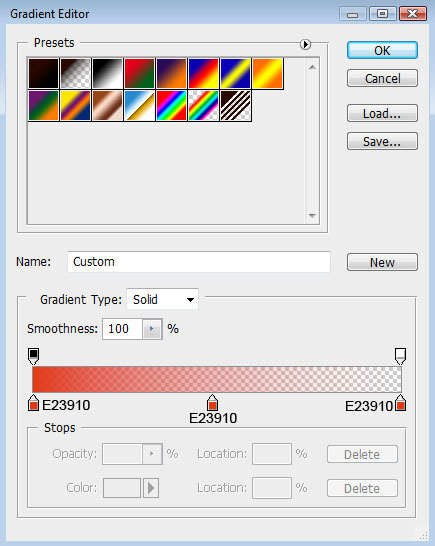
Click in the color bar to open the Gradient Editor and set the color stops as shown. Click OK to close the Gradient Editor dialog box.

We’ve got the next result:

Make a copy of the line’s layer and choose Free Transform (Ctrl+T) command to turn the line’s copy horizontally, placing it the same way demonstrated below.

Combine in a group all the wavy line layers (press CTRL button to select the necessary layers and hold on the left mouse’s button while dragging the selected layers on Create a new group icon from bottom part of the Layers panel). Make a copy of this group. Turn this copy over, applying the Free Transform (Ctrl+T) command and placing it the same way shown below.

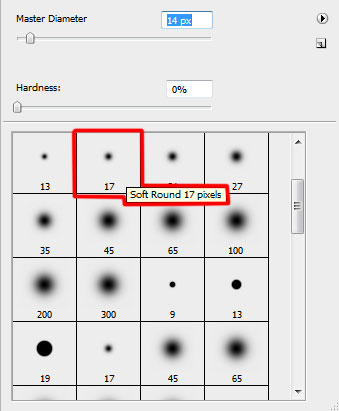
Create a new layer and select the Soft Round brush from Brush Tool (B), set Opacity to 50% in Options bar.

Use this brush to draw several highlights of white color on these lines.

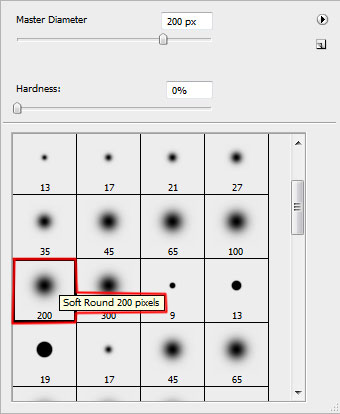
Create another new layer (Create new layer) where we shall apply the same brush to represent several spots on the central part of the picture.

We’ve got the next result:

Using the Free Transform (Ctrl+T) command, try to stretch out the spot horizontally and turn it over the same way shown next picture.

Use the same method described above to represent a white spot.

Set the Blending mode for this layer to Overlay.

Make a copy of the layer containing the white spot and select Free Transform (Ctrl+T) command to make the copy smaller and change the Blending mode to Normal.

Next we have to choose the Ellipse Tool (U) and represent the primary layer of a DNA molecule to be later.

Post Pages: 1 2
Tags: abstract, background, brushes, colorful, cs3, design, dna, effect, free, glow, Illustration, line, neon, Photoshop, poster, psd, shape


Jack
27/08/2009
You’ve forgotten/skipped some important steps; you should really review this tutorial and fix it.
george
04/09/2009
i dont get the 2nd step.
Set the next parameters for the last made layer by making a mouse click on this layer on the layers’ palette.
Fill 0%
Blending Options>Inner Shadow
Alex
23/09/2009
I am also having the same issue as george. I cannot figure out how to apply the effects to the object I just created with the pen.
Natalia
07/10/2009
I just wanted to tell you that your art work is AMAZING. I was literally struggling trying to figure out how to do a wavy background for my future web site. I learned AP on my own, so I have a lot of gaps to fill in still and I have to be honest I spent quite some time trying to follow your tutorials. However I never gave up and MADE it.
I am soooo glad I found your tutorials.Thank you for sharing your skills with us!
chrissi
10/10/2009
Im having the same trouble as alex and george i cannot apply the effects made to the line….i need help please.
dexlessin
22/10/2009
For people having trouble with step #2, all you have to do, is in the layers pallet, where all the layers are (1 at the moment) u have to unlock it, by double clicking it, and renaming it, then in the same place you now can change options, put fill to 0% and so on. hope that helped
Svenn
04/11/2009
For those of you struggling with the pentool part. Simply fill the path with some random color..then follow the steps further by setting fill to 0 etc…
abby
14/11/2009
Amazing effect loved it!
salimsalah
17/11/2009
this is it. wow
Neiri de Fatima
27/11/2009
Seu tutorial é maravilhoso, magnífico.
Sou iniciante, mas sei reconhecer o que é belo.
Pelos comentários acima nem vou tentar fazê-lo. É muito profissional.
Continue criando. Você é gênio.
Parabéns.
majid & ebi
10/12/2009
you shake me,this is very very interesting.
bloody nice tutorials.
Hakkeem
07/01/2010
this is Wonderful i like it
hashim
18/01/2010
awesome effect……
Beautee Paul
07/02/2010
Amazing effect. Loved it. Thanx
Dwayne
19/02/2010
I loved the tutorial.I don’t have the hang of using the pen tool yet so my lines were thicker than yours but I will continue to practice with it.One thing the example had these bubbles as well.How do you do those?Is it in another tutorial?
Sasi
12/03/2010
Its Amazing ya!
Maxxium
25/03/2010
my god i dont get this
rosa
09/04/2010
WOW!!!!!!!! these images are so cool!
Jofar
15/04/2010
I am a newbie to Photoshop and I was trying to follow your tutorial, which is great.
I managed to create the wavvy line(s) but I got stuck on the steps after creating the lines. I did follow the other steps but the effects were applied to the shape itself and not the line(s).
I also tried to fill the path as mentioned but when ever I tried to use the “Paint Bucket Tool”, it fill the entire background (including the original shape/stage). I have tried this a couple of times but have been very unsuccessful.
Can someone please help me.
andrea
15/04/2010
this tutorial would be great if the steps were complete! its driving me crazy, and i would love to complete it because it looks really nice. i’m very frustrated
would you please repost the tutorials with the exact complete steps? or email them to me? thank you
Me
01/05/2010
You really need to revise this tutorial -
Add things like:
1. When to add a new layer, everytime you add one – Assumption is the mother of all mistakes, so dont assume we know what you are doing when we try and go along step by step.
2. When to add fill, especially when you deal with your shapes.
3. Several of the steps you include are not duplicable when using your exact settings, corrections and adjustments had to be made along the way – not minor ones either.
etc…
Aside from that, great design!
sinju
22/05/2010
thank you
madu
17/06/2010
This is simple and nice one
Accounting Teacher
06/07/2010
Very beautful effect
Strainger
17/08/2010
Outstanding, Awesome, Excellent, Beautyful, Amazing, Breath-taking, unbelievable but true….choose yours, but they all count for this tut!
Thanks man!
Anonimus
01/09/2010
Nice, this will be my new deesktop background
matt
01/10/2010
fail
Freng
15/11/2010
Nice background, the only problem i have in design it is that am using CS4 photoshop package.please i need more explation on how to create the background
Robin
03/01/2011
Thanks for the tutorial. Looks great. Can’t wait to complete it.
haque
05/02/2011
Good effect, Bad Tutorial.
Anna
27/02/2011
Well, it’s a really cool process of doing it but it has a bad tutorial
Jack
03/04/2011
WTF!? The most important step in filling color into the pen shapes between step 2 and 3 are missing! How do you fill in color between the lines so that the blending options actually do something!? I – for incomplete tutorial.
asad
27/04/2011
gud but bad. some steps are missing
admin
07/06/2011
thank you to all readers … tutorial was rewrited and now you can download the free .PSD file for this tutorial
saud ansari
29/06/2011
PLZ REVIEW THIS TUTORIALS U HAVE NOT GIVEN THE COPMPLTE STEPS FOR THIS PHOTOSHOP TRICKS
δονητές
12/09/2011
It’s really a nice and useful piece of info. I’m glad that you just shared this useful information with us. Please stay us up to date like this. Thank you for sharing.
Iznogud
31/12/2011
Great tutorial! Beautiful pattern! Good work! Thanks!
Mike
25/01/2012
Hi Guys! those who cannot figure it out how. its kinda confusing but if you analyze it..Im sure you will find it as well. Once you use the pen tool be sure that (on the upper part of your Photoshop menu be sure that on the left side. there is a square shape that is automatically selected once you use your pen or ellipse tool then it will allow you to fill out color.. no need to use paint bucket etc. to fill out. Then you can apply now the inner glow etc.) hope it make sense..I like the tutorial especially the effects thumbs up!
Beto
07/04/2012
Very nice. I have added a link back from our designers blog. Thanks!
Kerin
24/05/2012
Nice..!!
denmasch
04/07/2012
great tutorial..thank you your posting
vesela
16/08/2012
Very great tutorial
minmi
25/08/2012
Hello ,
Too good and very helpful tutorial .. Maide my day !
Danni
11/09/2012
Awesome tutorial. I learned quite a bit from it. Thank you!
Carol
04/12/2012
All I was trying to do was follow the bubbles in the tutorial…it seems like something is missing with the highlight I keep trying to get them but they dont turn out right at all.
Johny
06/04/2013
This is amazing, I should try this soon. Thank’s