Merry Christmas Tree
November 6th, 2008 by ART-D Posted in Adobe Photoshop, Designing
Learn how to create your own Christmas tree wallpaper with these tutorial.
Final Image Preview

For the beginning create a new file (File>New) of 1280×1024 px and 72 dpi. The background should be painted with black color, applying the Paint Bucket Tool (G).

Using the Pen Tool (P), try to get a fir tree’s image out of a line.

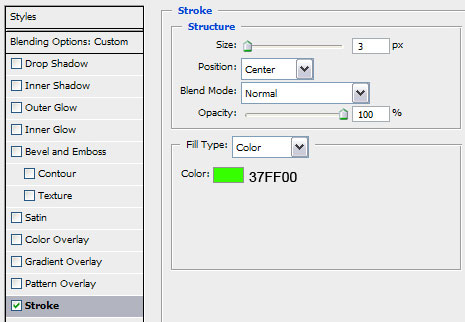
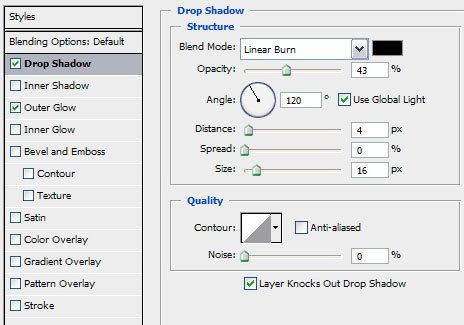
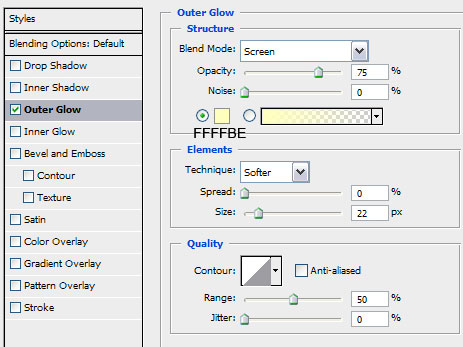
Select the next Blending Options by making a mouse click on the layer on the layers’ palette.

Next try to rasterize this layer. Then try to create a new layer near the previous one and mark them both out (press Ctrl + click on the layer), put the layers together (Ctrl+E). The unnecessary elements should be erased with the Eraser Tool (E). You’ll get the next thing.

Select now the Burn Tool (O) to dark out several fragments of this line, giving it also some volume.

Make a copy of this layer (Ctrl+J).

Next we’ll erase the dark line on the intersected lines, getting the effect of this line being situated behind the other.

Make several copies of the lines and displace them a little.

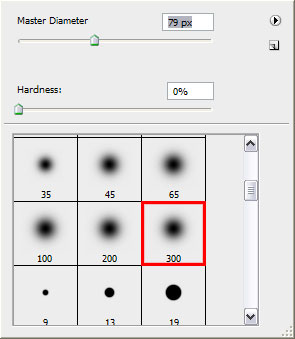
Next select the Brush Tool (B) out of the next table:

Create a new layer on which must be pictured a kind of smoke line, having the color #EDFE87 and the Opacity of 10%.

Create a new layer and represent with the Rectangular Marquee Tool (M) a rectangle figure, colored with #4BCE2A

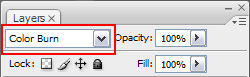
Change on this layer the Blending Mode with that one from below:

Our fir tree became more saturate.

Make a copy of the layer containing the smoke and situate it on the very top of the layers.

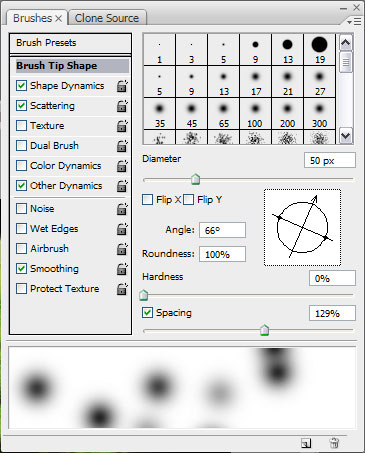
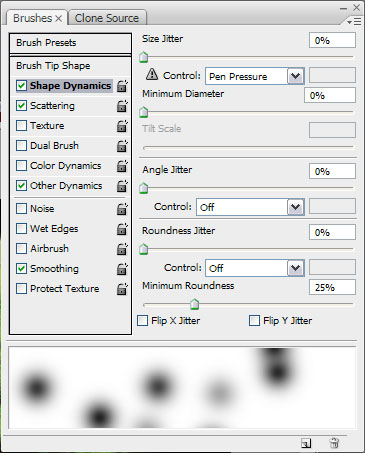
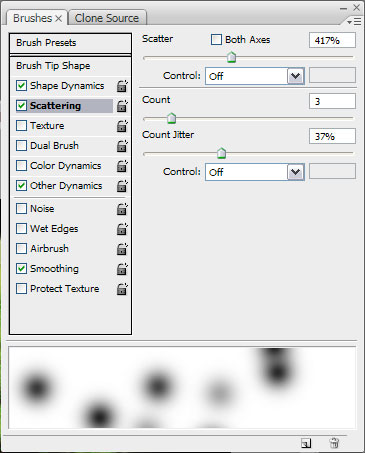
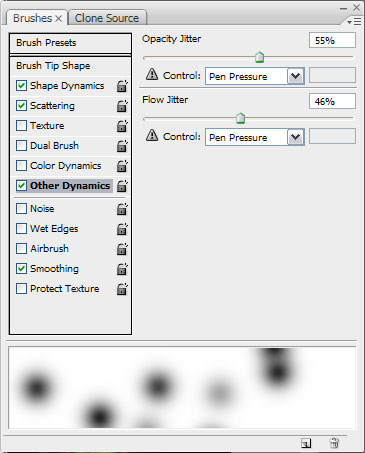
Now select the Brush mode (B) and its parameters on the top panel:

Set everything the same way demonstrated below:


Create a new layer and represent several illuminated spots with the same color we’ve pictured the smoke. Set for this layer the Blending mode – Overlay.

Repeat the same operation on a new layer again, changing this time the Blending mode on Normal and choosing a smaller size for the brush.

Repeat once again this operation, choosing even smaller brush than the previous time. Next situate on our picture the star selected out of the Custom Shape Tool (U), named 5 point star. The color’s code is #F6FF9F

Select for the star the Blending Options with the next indicated parameters:


Our fir tree is finished!
View full size here.
Tags: card, christmas, design, Photoshop, tree, wallpaper


stan
21/11/2009
this is great!perfect!
tala
02/12/2009
thank you! I wondered. I`m iranian. good luck
Roshan
06/12/2009
thanka. this very good.
Larissa
08/12/2009
Next try to rasterize this layer. Then try to create a new layer near the previous one and mark them both out (press Ctrl + click on the layer), put the layers together (Ctrl+E). The unnecessary elements should be erased with the Eraser Tool (E). You’ll get the next thing. – I JUST DONT GET IT. So I’m doing the pen tool part on the background? How do yo rasterize the background? Argh.
-electro-
09/12/2009
Hello. I am stuck….
After making (and closing) the tree path and going into blending options, the stroke settings don’t want to be applied to the path on my PS CS4.
Any ideas/help/details… or am I missing something ?
Please and Thank You.
Happy Holidays.
-electro-
Lasse
11/12/2009
@Larissa and Electro
I agree, tricky explanation.
The problem is that you start out drawing a vector path, it shoud be an Shape Layer (after selectinging the Pen tool click on “Shape Layer” (in top bar) before start drawing).
Good luck!
Jerry
23/12/2009
There is a mistake. You duplicate that resterized layer, not create new layer.
Tony
15/02/2010
So simple, but so beautiful, thanks
gashek
13/08/2010
Very beautiful!
sergio
13/08/2010
Nice lesson, i will try
stas
13/08/2010
Yes, its mistake about rasterize layer
Jo
24/10/2010
I’m stuck after drawing the tree shape. the blending options doesnt changes the line to green? do i need to fill the path?? thanks!
Aurel
27/10/2010
thax vo sharing…
i’ve tried it,,,
and i can make it…
not as gud as urs…
but at least i can do ur demonstration…
thx…
gudluck
Deriuqer Eman
13/11/2010
I’m stuck. I can’t do the first smoke line, the one with the color #EDFE87 and the Opacity of 10%. Can anyone help me?
BBelle
16/11/2010
Managed to do this took a while though… they should add at the top to read all of these comments before they start out.
There are A LOT of steps missing!!!
BBelle
16/11/2010
This is what I ended up with, could have created a bit more depth and need to change the star a bit as CS5 has a slightly different star by default – but by then I was just about done with it all!
http://img251.imageshack.us/img251/7480/finishedtreef.jpg
RWER
08/12/2010
WERWER
MEL
15/12/2010
Beautiful effect! Thanks!
If you have a Wacom tablet and a steady hand, you could just do the tree spiral in straight PS and not have to create a pen path.
DWC
15/12/2010
I am TOTALLY stuck. Can someone PLEASE email me a BETTER tutorial than this? TOO MANY MISSING STEPS! I have Photoshop CS4. I am getting stuck on the changing of the color after drawing the line with the pen tool!
EMAIL:
DCecil1982@Gmail.com
Thanks!
ramy
27/12/2010
i can’t use the burn tool to dark the picture
help meeeeeeee
Trusti
17/05/2011
Thank you for your post it was very good and excuse for my english! I am still learning