
Valentine’s Day
Make your own Valentine’s Day card for a loved one, not just with love and sincerity but some of that creativity you have built up inside you too!
Final Image Preview

Start working by creating a new file (File>New) of 1920×1200 px and 72 dpi. Then choose the Paint Bucket Tool (G) to give #300703 color for the made file.

Next try making several lines representing an ornament, starting by creating paths, using this time the Pen Tool (P) (Path Mode), press ESC button after each path to begin to draw another path


Create a new layer and select for it a standard brush and the color #520B07 (Diameter 9px, Hardness 100%). Click on the Paths Palette use the Direct Selection Tool (A) to select one of the created paths
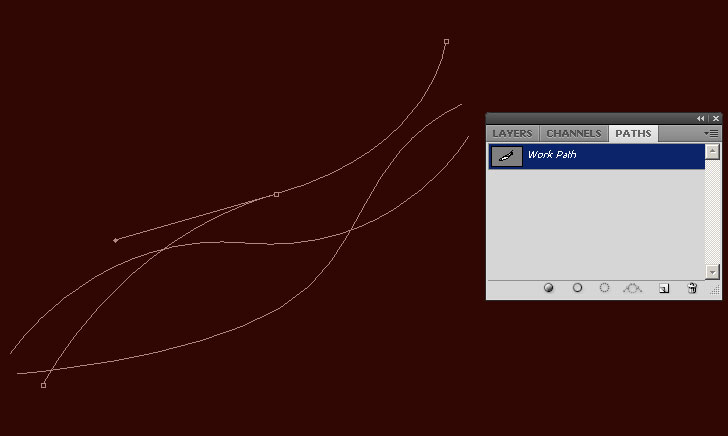
and then change the tool on the Pen Tool (P) and make a right click on the selected path to use Stroke Subpath
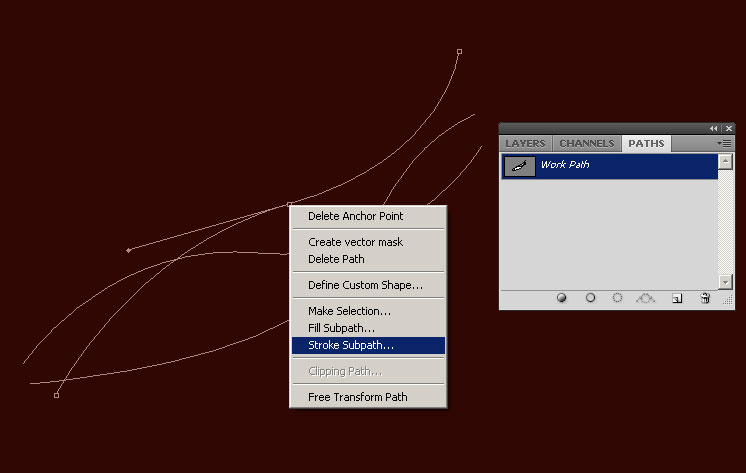
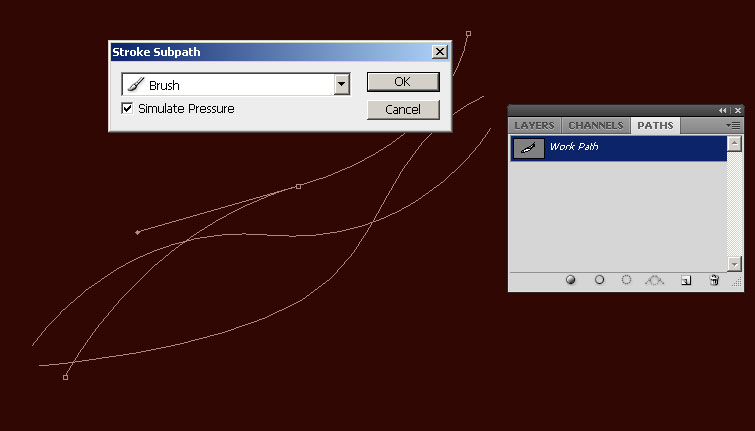
Use Brush and check Simulate Pressure

On the new layer we’ll apply the Polygonal Lasso Tool (L) and represent a kind of marked zone under the previous made line.

Select for the same layer after that a standard brush of black color (Opacity of 50%) to dark out the selected zone under the line.


Next we’ll represent a new layer and select for it a standard brush of #C94F02 color (Diameter 9, Hardness 100%). Click on the Paths Palette use the Direct Selection Tool (A) to select next one of the created paths
and then change the tool on the Pen Tool (P) and make a right click on the selected path to use Stroke Subpath with Brush and Simulate Pressure options:

The layer’s parameters: Fill 40%

Make a copy of the last layer containing the recently made line and choose for it the next option: Filter>Blur>Motion Blur


Next we have to represent a new layer (Create new layer) and use here a standard brush earlier mentioned (Diameter 100, Hardness 0%, Opacity 80%). Place this layer under the layer containing the black brush (on the layers’ panel) and try to paint out the top border of the very first line and the picture’s middle part. The brush has the color #B52301

Create a new layer and select out the next path from Paths Palette. Applying the same operations mentioned above, we may Stroke Subpath with the color #E8842F

The layer’s parameters: Fill 69%, Blending mode-Soft Light

Make a copy of the last made layer, changing the parameters of the copy on those indicated below: Fill 100%, Blending mode-Pin Light. Select also for the last layer the selection from here Filter>Blur>Motion Blur (the same one we’ve applied before).

Make one more copy of the line’s layer (without any effects) and set for the copy’s layer the next option: Filter>Blur>Motion Blur


The layer’s parameters: Fill 51%, Blending mode-Hard Mix

Create a new layer and do the same operations we did before on selecting the next path and Stroke Subpath with the color #FEB741

The layer’s parameters: Fill 45%
 Using a standard brush with the Opacity of 70% on a new layer, it’s possible to represent a highlight in the middle of the picture. The color chosen this time is #FFE475


The layer’s parameters: Fill 62%, Blending mode-Linear Light

On the next new layer we’ll apply again the standard brush mentioned above to insert some color on the newly made highlight. The brush’s color is #B52301 (Opacity of 20%).

Make a copy of the layer containing the earlier made line that we’ve done before representing the yellow highlight. Set for the copy this selection – Filter>Blur>Motion Blur


The layer’s parameters: Blending mode-Vivid Light

Create a new layer the same way we did before and choose here a standard brush with the color #FFDCA1 (Diameter 9, Hardness 100%). Then select from the Paths Pallete another path to Stroke Subpath.

Page: 1 2
Comments