
Design a Stylish Poster mixed with displacement effect in Photoshop CS5
In this tutorial, you’ll learn how to combine layer masks with custom brushes and adjustment layers to create eye catching poster mixed with displacement effect, using simple but effective techniques in Adobe Photoshop CS5. Layered PSD file included. Let’s get started!
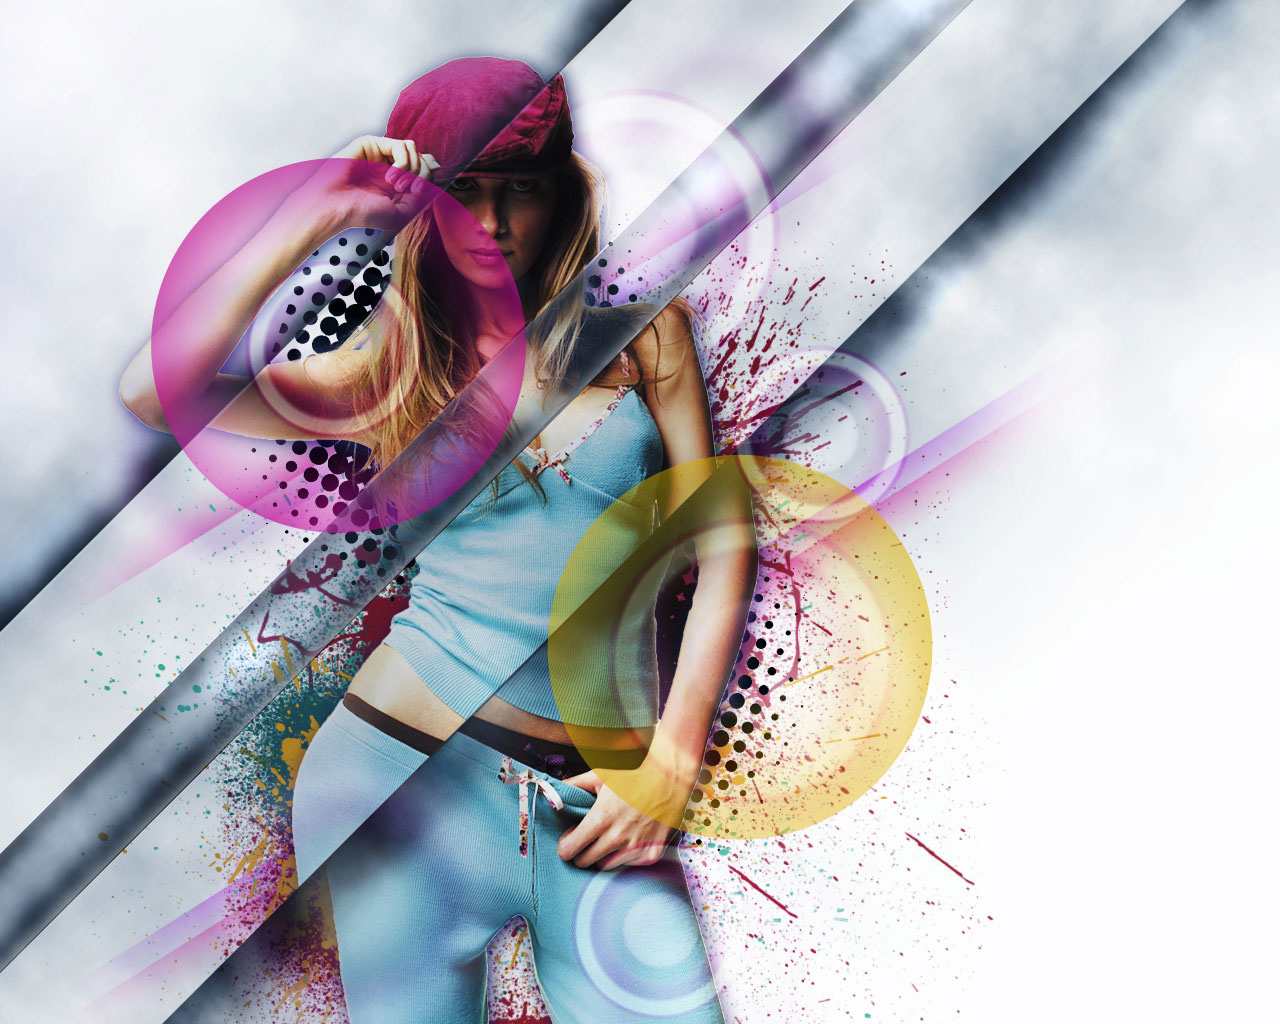
Final Image Preview

Inspired from Demi Lovato by Jeno Panganiban.
Start working by creating a new document (Ctrl+N) in Adobe Photoshop CS5 with the size 1280px by 1024px (RGB color mode) at a resolution of 300 pixels/inch. Use the Paint Bucket Tool (G) to fill with white color the new background layer.
Find a stock photo with a model represented on it, I used this photo from deviantart. I would like to thank the author of this photo, or if you prefer, you can substitute similar image of your own.

Remove the background using your favorite tools like Pen Tool (P), Magic Wand Tool (W), Magnetic Lasso (L) or even a simple Filter>Extract and insert it on a new layer in our main document.


Click on Add a layer style icon from bottom part of the Layers panel and select Drop Shadow style for model’s layer.

We’ve got the next result:

Create a new layer and make a selection, applying the Rectangular Marquee Tool (M). Place this layer under the girl’s one.

Select the Soft Mechanical brush from Brush Tool (B).

Use this brush to paint the top edges of the selection using #E694FF color as shown .

Using the Free Transform (Ctrl+T) command, let’s incline a little the line, the same way shown on the next picture.

Applying the same method, it’s possible to create the next line of the color #E27FC4.

Insert the mask on each layer with line by choosing Add layer mask on the bottom part of the Layers panel and choose the Soft Round brush of black color.

Use this brush to paint in the mask to hide the lines’ edges.

Make copies of both layers containing the lines and choose the Free Transform (Ctrl+T) command to turn over the copies’ layers, placing them as it is shown below. Place the layers under the girl’s layer.

Next step we’ll download set of brushes for Adobe Photoshop, named: Splat Brushes.
Create a new layer and use the next brushes from Splat Brushes set.

Add some brushstrokes with the next colors: #DFA63D, #5CC1AA, #952941, #A34057, #3C7075. Place the layers with the brushes under the girl’s layer.

Create now a new layer and fill it with white color using the Paint Bucket Tool (G). Choose the Soft Round brush of black color and represent two spots.

Place this layer under the girl’s one.

Select for the layer with the brushes the next filter Filter>Pixelate>Color Halftone.

We’ve got the next result:

Set the Blending mode for this layer to Darken.

Create a new layer again and use the Paint Bucket Tool (G) to fill it with #052C52 color.

Insert the mask on the layer by choosing Add layer mask on the bottom part of the Layers panel and use then Filter>Render>Clouds.

Now we have to paint in the mask (where we’ve used Filter>Render>Clouds) with Soft Round brush of black color (set Opacity to 20% in Options bar) to hide the next zones the same way demonstrated below:


Let’s create a new layer now and apply here the Paint Bucket Tool (G) to fill the layer with #101010 color.

Insert the mask on the layer by choosing Add layer mask on the bottom part of the Layers panel and use then Filter>Render>Clouds.

Above the previous layer we have to create a new one. Select both layer in Layers panel by pressing CTRL button and then press CTRL+E to Merge Down. Insert on this layer the mask (Add layer mask) and press CTRL+I to Inverse the color.

Using the Rectangular Marquee Tool (M) represent a selection in the mask.

Right-click inside the selection and choose Transform Selection to incline this area on the left side on 45 degrees. We have to represent three zones of the same kind inside of which we have to paint using Soft Round brush of white color to clean out the zones in the mask.

We’ve got the next result:

Now we have to paint in the mask containing three inclines lines with Soft Round of black color (Opacity – 20%) to hide the edges of the lines the same way demonstrated next picture.

Make a copy of the last made layer and paint in the mask the lines, applying the same brush but using different value for Opacity.
Set the Blending mode for this layer to Linear Light.

Make one more copy of the last made layer.

Create a new layer and represent here the next selection with the Rectangular Marquee Tool (M). Incline the selection on 45 degrees too and fill this area with black color, using in this case the Paint Bucket Tool (G).

Set Fill to 0% for this layer and click on Add a layer style icon from bottom part of the Layers panel and select Inner Shadow.

Add Inner Glow

We’ve got the next result:

Make two copies of the last made layer and use again the Free Transform (Ctrl+T) command to place the copies the same way demonstrated below. Also we have to change the Inner Shadow settings for layers.

We’ve got the next result:

Insert now the mask on indicated layers by clicking on the bottom part of the Layers panel on Add layer Mask and select after that Soft Round brush of black color.

Use this brush to paint in the mask to hide the top and the bottom edges of the lines.

Next we have to rasterize the layer with the model on it. In this case we have to represent a new layer above the model’s one and press CTRL button to select both layers. Finally press CTRL+E to Merge Down. On the rasterized layer we’ll make the next selection using Rectangular Marquee Tool (M).

Right-click inside the selection to select Transform Selection and incline the area on 45 degrees again the same way we did before.

Use the Move Tool (V) inside the selection, click and move the line as it is shown below. This way we have to represent and move three lines on the model. Press on each line CTRL+C and CTRL+V. This way the lines will be created on separate layers.

Those three layers moved away we have to put together in a single one. Press for this operation CTRL button to select the layers and then press CTRL+E to Merge Down. Place two layers one above the other. One layer containing one group of lines and the other containing the other group.

Now we have to create above the Layer 13 an adjustment layer, click Create new fill or adjustment layer from bottom part of the Layers panel and click to Curves to adjust the curve shape as shown to make a little color corrections.

We’ve got the next result:

Make a copy of the recently made layer with the Curves adjustment and place it above the other group of lines on the girl.

We’ve got the next result:

Hold down Alt (Windows) or Option (Mac OS) and click between each layer with the Curves adjustment and each layer containing the model’s lines in the Layers panel to create a clipping mask.

We’ve got the next result:

Create an adjustment layer above all the layers by clicking Create new fill or adjustment layer from bottom part of the Layers panel and click to Curves to adjust the curve shape as shown to make a little color corrections.

We’ve got the next result:

Now we have to represent a small ellipse, using the Ellipse Tool (U).

Set Fill to 0% for this layer and click on Add a layer style icon from bottom part of the Layers panel and select Gradient Overlay.

Click in the color bar to open the Gradient Editor and set the color stops as shown. Click OK to close the Gradient Editor dialog box.

We’ve got the next result:

Make a copy of the ellipse’s layer and choose the Free Transform (Ctrl+T) command to place the copy as it is shown below, changing also the Gradient Overlay settings on the copy.

Click in the color bar to open the Gradient Editor and set the color stops as shown. Click OK to close the Gradient Editor dialog box.

We’ve got the next result:

Using the same tool, let’s represent one more ellipse.

Set Fill to 0% for this layer and click on Add a layer style icon from bottom part of the Layers panel and select Gradient Overlay.

Click in the color bar to open the Gradient Editor and set the color stops as shown. Click OK to close the Gradient Editor dialog box.

We’ve got the next result:

Let’s rasterize now the ellipse’s layer. In this case create a new layer above the original one and press CTRL button to select these two layers and press in the end CTRL+E to Merge Down. Using the Free Transform (Ctrl+T) command, we may place the circle as on the picture below:

Make three copies of the layer with the ellipse on it and choose Free Transform (Ctrl+T) command to change the copies’ sizes, placing them the same way indicated below:

Now we have to insert the mask on the very primary layer with the circle. Choose Add layer mask on the bottom part of the Layers panel and select the Soft Round brush of black color.

Use this brush to paint in the mask to hide the circle’s edge, mentioned with the pointer.

We’ve got the next result:

Now we have to make some copies of the ellipses’ layers and apply for each copy the next filter: Filter>Blur>Gaussian blur.

Use Free Transform (Ctrl+T) command to placing them the same way indicated below.

Click Create new fill or adjustment layer from bottom part of the Layers panel and click to Curves to adjust the curve shape as shown to make a little color corrections.

We’ve got the next result:
Finished!
View full size here.
Download free Layered PSD file.
Comments