
How to create elegant Valentine’s Day card with ornamental heart in Photoshop CS5
In the following Quick Tip tutorial you will learn how to use Custom shapes, Layer styles, and Gradients in Photoshop CS5 to create elegant Valentine’s Day card with ornamental heart. You can use these techniques and elements to create your own greeting card! Layered PSD file included.
Final Image Preview

Start working by creating a new document (Ctrl+N) in Adobe Photoshop with the size 1280px by 1024px (RGB color mode) at a resolution of 72 pixels/inch. Use the Paint Bucket Tool (G) to fill with #B81220 color the new background layer.

Click on Add a layer style icon from bottom part of the Layers panel and select Gradient Overlay.


Click in the color bar to open the Gradient Editor and set the color stops as shown. Click OK to close the Gradient Editor dialog box.

We’ve got the next result:

Create a new layer, set Fill to 0% for this layer and click on Add a layer style icon from bottom part of the Layers panel, select Inner Glow.

We’ve got the next result:

Next step we’ll download set of brushes for in Adobe Photoshop, named: Florar_and_Enchanting_II_by_Coby17.
Create a new layer and select the next brush from Florar_and_Enchanting_II_by_Coby17 set.

Change Foreground color to #660A17, use this brush to add some brushstrokes on the background as shown. Use different value for brush’s Opacity.

Make a copy of the last made layer and apply on the copy the next filter: Filter>Blur>Gaussian blur.

We’ve got the next result:

Select the Custom Shape Tool (U) in the Tools bar, in the Options bar click the Shape to open the selection menu. Find Heart at the bottom of the menu, and then double-click a shape thumbnail to select it.

Click and drag to draw a small heart.

Set Fill to 0% for this layer and click on Add a layer style icon from bottom part of the Layers panel, select Stroke.


This is temporary path where we’ll insert the ornamental shapes we need, using the same Custom Shape Tool (U). We’ll use the next shapes to fill our heart.

Click and drag to draw a small star:

Set Fill to 0% for this layer and click on Add a layer style icon from bottom part of the Layers panel, select Stroke.

We’ve got the next result:

The next star’s shape will be represented with the same tool. Select the inside anchor points of the star firstly using the Convert Point Tool (by holding SHIFT button) and then press CTRL+T (Free Transform). Click on Maintain Aspect Ratio from Options bar and drag the anchor points to the central part of the star to change the shape form.

Set Fill to 0% for this layer and click on Add a layer style icon from bottom part of the Layers panel, select Stroke.

Next we’ll fill with different shapes the entire heart’s zone. Turn over the ornamental shapes using the Free Transform (Ctrl+T) command.

Hide the layer containing the heart’s path. All the layers of the ornamental shapes should be combine in a group (hold Ctrl button to select the corresponding layers in Layers paneland hold on the left mouse’s button while dragging the selected layers on Create a new group icon from bottom part of the Layers panel).
Select the new group and press CTRL+E to Merge Down into a single layer. Click on Add a layer style icon from bottom part of the Layers panel and select Drop Shadow.

We’ve got the next result:

Create a new layer and fill it with white color, using the Paint Bucket Tool (G). Set Fill to 53% for this layer and change the Blending mode to Overlay.

Create a new layer and choose the Soft Round brush of black color (set Opacity to 15% in Options bar).

Use this brush to make darker the canvas edges:

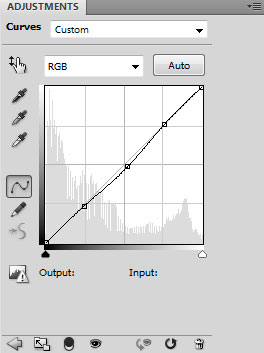
Click Create new fill or adjustment layer from bottom part of the Layers panel and click to Curves to adjust the curve shape as shown to make a little color corrections.
We’ve got the next result:
Happy Valentine’s Day!
View full size here.
Download free Layered PSD file.
Comments