
How to stylise model shoot using colourful shapes in Photoshop
In this tutorial, I will show you the steps I took to stylise model shoot using colourful shapes in Photoshop CS5. We will use advanced compositing techniques, layer masking and custom brushes to get an eye-catching poster. Let’s get started!
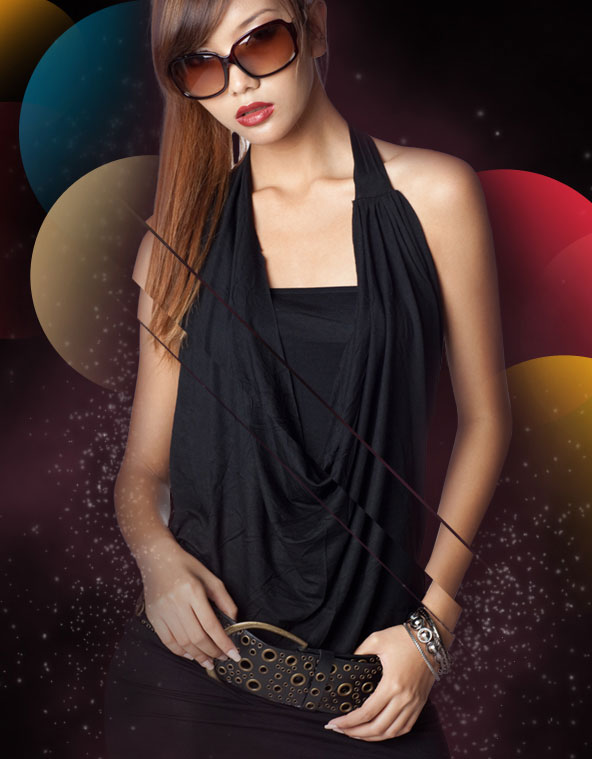
Final Image Preview

Start working by creating a new document (Ctrl+N) in Adobe Photoshop with the size 1280px by 1024px (RGB color mode) at a resolution of 72 pixels/inch. Use the Paint Bucket Tool (G) to fill with black color the new background layer.

Create a new layer and use here the same Paint Bucket Tool (G) to fill this layer with #4E2835 color.


Insert the mask on the layer by choosing Add layer mask on the bottom part of the Layers panel and apply after that th next filter: Filter > Render > Clouds.

Create a new layer and select Soft Round brush of black color.

Use this brush to make darker the canvas edges.

Find a stock photo with a model represented on it, I used this photo from Shutterstock, or if you prefer, you can substitute similar image of your own.

Remove the background using your favorite tools like Pen Tool (P), Magic Wand Tool (W), Magnetic Lasso (L) or even a simple Filter>Extract and insert it on a new layer in our main document.

Click on Add a layer style icon from bottom part of the Layers panel and select Drop Shadow for the model’s layer .

Apply Inner Shadow:

Add Outer Glow:

We’ve got the next result:

Create a new layer and use the Soft Round brush of different diameters to represent many small dots on the canvas.

The brushes’ color is #402F35. Place the layer with small dots under the model’s layer in Layers panel.

Set the Blending mode for this layer to Hard Light.

Make a copy of the last made layer and use the same Soft Round brush to represent more dots of the same color. This layer will be situated under the layer with the model on it.

Make a copy of the last made layer and apply on the copy the next filter: Filter > Blur > Gaussian blur.

We’ve got the next result:

Next we have to use the Ellipse Tool (U) to draw four small circles which layers will be situated under the model’s layer.

Insert the mask on the layer by choosing Add layer mask on the bottom part of the Layers panel and choose the Soft Round brush of black color (set Opacity to 40% in Options bar).
Now we have to insert on each circle’s layer the mask (by choosing Add layer mask on the bottom part of the Layers panel). Then select the Soft Round brush of black color (set Opacity to 20% in Options bar).

Use this brush to paint in the mask to hide the circles edges, representing this way the shadows.

This way we have to represent four more circles, having the same colors the previous have.

Let’s represent now above the model’s layer a new one (Create new layer) and hold CTRL button to select the new layer and the model’s one. Then press CTRL+E to Merge Down. Insert now the mask on the layer by choosing Add layer mask on the bottom part of the Layers panel and choose the Soft Round brush mentioned above. Use this brush to paint in the mask to change a little bit the opacity of the model’s layer as shown.

Represent a selection now, using the Rectangular Marquee Tool (M).

Right-click inside the selection and choose Transform Selection, rotate and place the selection the same way as below.

Select Move Tool (M) and click to Apply Transformation.

Now you can use arrow keys buttons on a keyboard to displace this selection.


When you finish to displace just press Ctrl+D to deselect.

We have to repeat the operation three times to separate the model by layers of different thickness.
Page: 1 2
Comments