
1981 was a f*$&ing great year
Made by Poser
This tutorial is about creating fantastic and unique gifts to your friends.
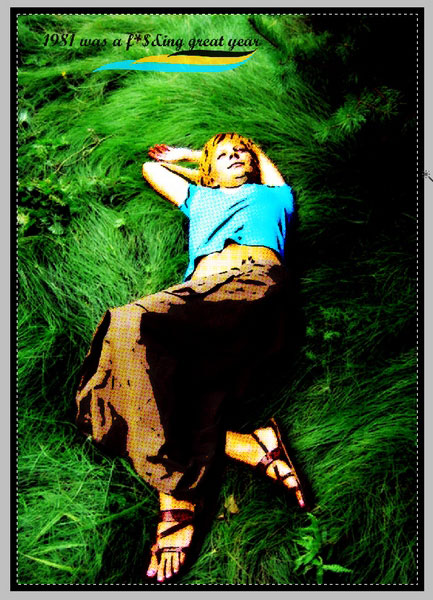
This picture I made for one of my friends birthday, I didn’t really knew what she loves more than herself, so I decided to give her a print of herself. It worked, for a half of hour or so she was running with my giant print and showing it to all guests at the party. I was happy, she was happy, what can be better!? So let’s start!
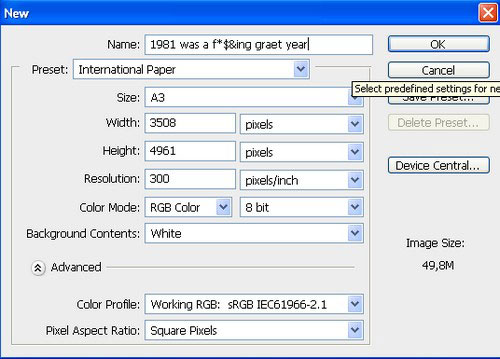
1. For the beginning create a new document with the dimension of the print you want to make. Go File > New with 3508×4961 px and 300 dpi, a standard A3 paper.
2. Place in the original picture you selected by going File > Place. Scale it up or down, depending on the dimensions of your shot, by pressing Ctrl + T, in my case it was smaller so I had to drag by one of the corners holding down Shift + Alt keys to keep the proportions of my photo intact. After you are covered the file surface and placed it right press Enter key to accept the transformations you’ve made, or if you don’t like something you’ve done press Esc key and try again.
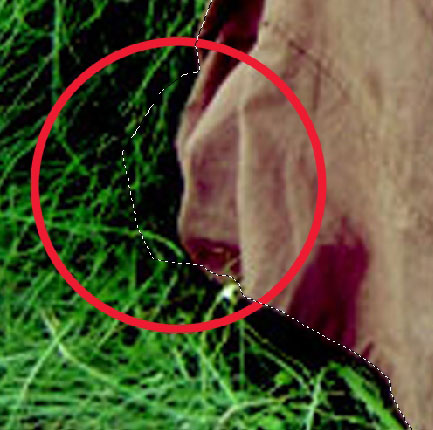
3. Name the layer Original by double-clicking on layer’s name in the layer’s palette. In my case I’m OK with background in this photo but I still want to focus on the girl with s special filter or something so I need to cut her out. To do that select the Polygonal Lasso tool by simply pressing L key, zoom in by holding down Alt key + scrolling up the mouse wheel. ( By the way if you scroll down the mouse wheel while holding down the Alt key you will zoom out, just to let you know.))) ) If you are not common with the Polygonal Lasso tool I will give you some tips. If you want trace the smallest details you have to zoom very much, but how to move around??? Simply hold down the Space Bar and you will see a little hand appearing that’s the Hand tool, now just Left click on the image and drag your picture around. The Hand tool is always activated by the Space Bar, from any other tool. If you made a trace mistake, like I’ve done here, and traced some unwanted region, don’t get mad and cancel the trace by pressing Esc key. Just keep your cool and get on the right track and finish the trace.

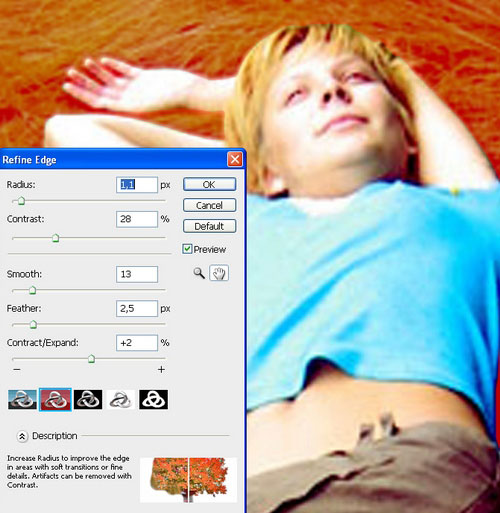
Then you’re done go to Tool option panel in the upper – left corner. Make sure the Polygonal Lasso tool is still selected, then press the Subtract from selection button and carefully trace out the part you don’t want to see in your selection. Here you go, now it’s perfect. But still edgy, go Select > Refine Edge or just press Ctrl + Alt + R play with the options till your border looks the best it could then press OK.

4. With the Original layer selected and with the section you’ve made with the Polygonal tool on press Ctrl + C to copy the traced object. Now press the Create new layer button in the lower – right corner of the Layer’s palette to create a new layer. Double click on its name to change it go Girl. Now press Ctrl + V to paste. Click on the eye icon right next to your Girl layer in the layers palette to make it disappear for now.
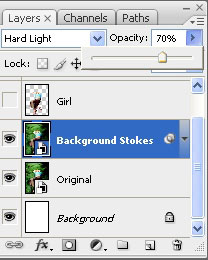
5. Select the Original layer again and drag it on the same old Create new layer button in the layers palette to duplicate this layer. Double – click its name to change it to Background Strokes, because that’s what will do to him. With the layer selected go to Filter > Brush Strokes > Sprayed Strokes. In the filter’s dialog box raise Stroke Length and Stroke Radius to maximum cause we are working here with a real large picture, and leave Stroke Direction – Right Diagonal, I think it looks better this way. The rendering may proceed slowly, because I repeat we are working with a real large picture. Have patience, it will pay out! Then you’re done press OK.
6. Now change the blending mode to Hard Light in the blending mode drop down box in the layers palette, and lower the opacity to around 70% in the same palette. See how the color busts out? Like it? )) I thought so. I you don’t try so more combinations of blending modes and opacity, always fill free to explore, it may take more time to make something, but it can bring you some unexpected great results.
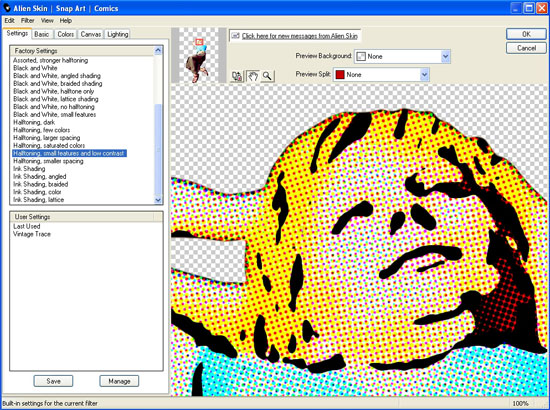
7. Now back to the Girl layer, turn it back on by clicking again in the eye check box right next to layer’s name. So for the next step you will need a special filter which not all of may have, but definitely all of you MUST get! It’s called Comics from the Alien Skin Snap Art pack, and can help you create amazing comic art easy as pie. So if you both it or downloaded it I don’t really care, just make sure It’s properly installed on your PC. Now go to Filter > Alien Skin Snap Art > Comics and chose Halftoning, small features and low contrast from factory defaults, and press OK.
8. Now with the Girl layer selected change the blending mode to Vivid Light and lower the opacity to 25%. After drag the Girl layer on the Create new layer button to duplicate it. Name the new layer Girl Burn, change its blending mode to Color Burn and raise the opacity to 75%. Like it? I bet you do!
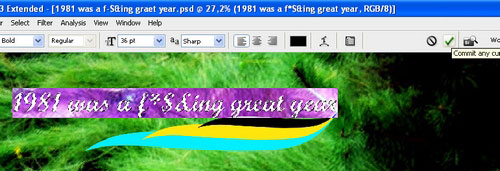
9. Next thing we do it’s the type. Think of what you want to type first. My friend was born in 1981, so to make her one more nice thing I made up this one ?1981 was a f*$&ing great year?. Now choose the font. To give it a little retro look I chose a brush script font. The one I used is called ?Brush MT Bold?. Select the Type tool by pressing T key and type in your text. Rename your text layer after the thing you wrote in there, my is called ?1981 was a f*$&ing great year?.
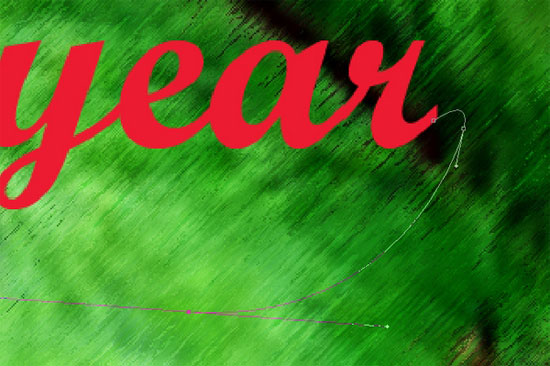
10. But what is a brush script without a nice tail, if your font has one or more is great, my didn’t so I had to draw one myself. Select the Pen tool, zoom in on the end on the last letter and start drawing. Just be sure that in the tool option panel Path button is pressed. When you’re done and satisfied with the Pen tool still selected right – click on the path and select Make selection. After press Create New Layer button in the layers palette, name it Tail and fill it with the same color you type is. How to do that? With your tail selection still on, choose the Eyedropper toll by pressing I, left – click anywhere on your type, and after Alt + Backspace to fill the selected area with the foreground color. Ctrl + D to deselect.
11. Ok now you have a nice text tail. But I think that the picture is kind of empty. So let’s add some catchy element. With the Tail layer selected Alt + Drag away on the tail to make a quick copy of the layer. Name it Tail Big. Ctrl + click Tail Big icon in the layer’s palette to select it, then go to the girls head and select a yellow color from her hair you like the best and after that fill your selection with the selected color by pressing Alt + Backspace. But your Tail Big layer is on top of the Tail layer and it’s hiding it. Drag it under the tail layer in the layers palette or do the same thing by simply presing Ctrl + {. Now with the Tail Big layer still selected, pres Ctrl + T to make it bigger, don’t worry about the tail we will deal with it later, just make it a qurter bigger then the first tail, drag it down and a little left till you think they colyde togever very nice. Now select the Eraser tool by pressing E, choose a sharp small brush in the options pannel and delete that part of the tail that is showing over tha first tail. Now it’s time to deal with this little space that is showing betwean our two tales. Select the Brush tool by presing B, in the options pannel chose a small and sharp brush, Alt + click on your Tail Big to select it’s color, and simply paint that gap away.

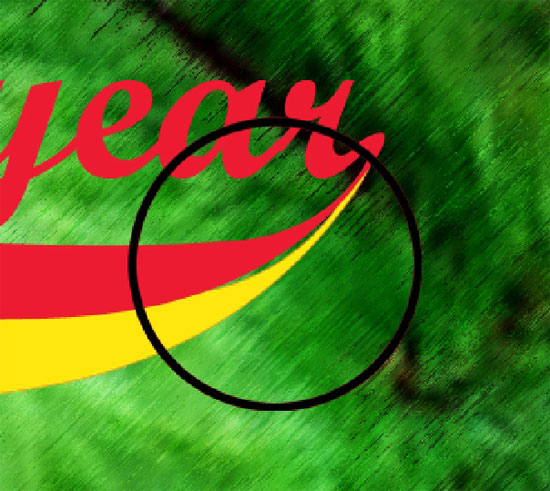
12. Now Alt + Drag away on your Tail Big to make another quick copy. Place the layer under Layer Big and name it Tale The Biggest. Color it in blue which you can select from girls shirt the way you already know haw. Scale it, and place it the way you did with Tail Big. Now you have a nice tail composition don’t you think? But wait a second I used Red color for the text and Tail layer just to make it more visibale, but I’d like them to be black. The Tail layer shod be no problem for you to color now, but for the type there are 2 ways of doing it. 1. You can right – click on the ?1981 was a f*$&ing great year ? layer in the layers palette and choose Rasterize Type from the appearing menu, by doing this you will transform type to pixels and haw to color pixel layers you know already, but also you will lose the ability to edit the text whenever you like (god knows how many birthdays can be? ))) ). 2. You Ctrl + double click the type layers icon in the layers palette, you will see that all the type layer gets selected, and in the tools options panel click on the color box to choose the needed color, this time is black, and after that be sure to click on the Commit any current edits button in the same panel. Here you go everything is black now.
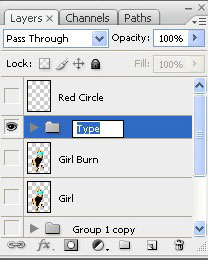
13. Now I think it’s better to group all our type related layers. To do that simply Ctrl + click the type layer and all tail layers and press Ctrl + G to group them. Double – click on the group’s name to change it to Type. Now drag the group on the Create new layer button in the layers palette to duplicate it. Name the new group Type Final. Click on the eye icon next to Type group name to make it disappear, you will probably need it if have to make some type changes. Now click on the arrow next to the name of Type Final layer to show the elements inside. Go to the ?1981 was a f*$&ing great year ? layer and rasterize it by left – clicking on it an choosing Rasterize Type from the appearing menu. Now select all layers inside Type Final group by Ctrl + click on every one of them and merge them together by left – click on one of the selected layers and choose Merge layers. Now you have only one layer which contains the type and all tails. Change its blending mode to Pin Light and lower the opacity to 90% to some background thru.
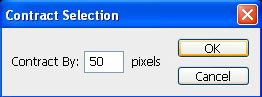
14. We’re almost done. The only thing this print misses it’s a frame. Let’s make one as simple and quick as possible. Create a new layer by clicking on Create new layer button in the layers palette, and name it Frame. Make sure it’s the top layer, if it’s not drag it up in the layers palette, or do the same thing by pressing Ctrl + Shift + }. After press Ctrl + A to select all image surface, press D to select black as the Foreground color, and now press Alt + Backspace to fill the selection with the Foreground color. Everything gets black but don’t be scared. Now go to Select > Modify > Contact, enter the value of 50 pixels and press OK. Now your selection gets contracted by 50 pixels on each side, leaving you a nice 50 pixels wide black frame, so the only thing there is to do is press Delete to empty the current selection. Press Ctrl +D to deselect and you are dome. Go print it and don’t be late for the party!
Comments