
Why Layers (page 5)?
To sharpen images, the Filter > Sharpen > Unsharp Mask should always be your first choice. The sharpen tool in the toolbox can be used for adding sparkle to specular highlights, but otherwise, its best to stick with the unsharp mask.
For information on how to use the settings in the unsharp mask dialog box, please see my Sharpening tutorial in the Photoshop section.
In Photoshop, there is an option that allows you to change the blend mode and opacity of a filter after it has been applied. (It’s found via Edit > Fade Filter in v. 6.0; it’s at Filter > Fade Filter in earlier versions.)
One of the best uses of this feature is to change the blend mode of the unsharp mask filter from Normal to Luminosity after it has been applied.
This is because sharpening can often introduce off-color halos to the edges it sharpens in color images. By using the Luminosity blend mode, you exclude color information from the blend.
Since you don’t have this Fade feature in Elements, sharpening a duplicate layer, and using the layer blend modes is a way to approximate this effect.
Another common sharpening technique used for portraits where you might want the eyes and mouth to be very sharp, but the skin to be a little blurry, and soft is to sharpen a duplicate layer, and use a layer mask to limit its application to the eyes and mouth.
If you would like to try this, you’ll need to read through my Layer Masks tutorial to find out how to add a mask to a layer in Elements.
You can do a crude approximation of a layer mask’s effect by using the eraser with a soft brush and a low opacity to stroke away sections of the duplicate, sharpened layer over areas of the image where you want the unsharpened, softer layer below to show through.
I’m going to show you a simple, fun way to use sharpening, along with Gaussian blurring to create an artistic effect.
To start, I used the lasso tool to drag a loose selection around the flower. See below.
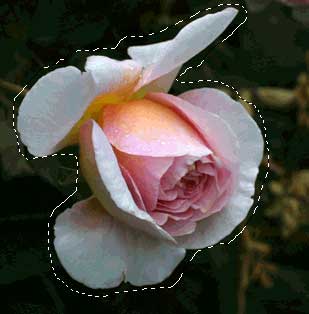
With the selection active, I chose Select > Feather and entered 2 in the dialog box that appeared.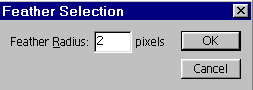
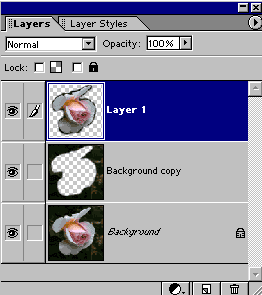
After making sure the duplicate layer was selected in the Layers palette, I chose Layer > New > Layer via Cut. You can use Layer via Copy if you prefer. It won’t make any difference in this case, though it’s easier for me to show you what I’m doing if I use Cut.
Please note that the Layer > New > Layer via Copy (shortcut is Ctrl-J) is very, very handy. Just drag a selection around the area you want to work on, give it a little feather, and click Ctrl-J to copy the selection to a new layer.
You can use this command any time you want to isolate a part of your image on another layer for correction—which is what this tutorial is all about!
You can see the resulting layers (from Layer via Cut) in the illustration above. I selected the top layer, with the cutout rose on it, and applied Filter > Sharpen > Unsharp Mask using a setting of 120 % for Amount, and the default radius and threshold.
Next, I selected the middle layer which has the green background on it, and applied Filter > Blur > Gaussian Blur using a very large radius (5) to make the background completely soft. The resulting image is shown, below.
If you try this effect, it’s a good idea to magnify your image, and go over the edge where the sharp layer meets the blurry one to look for abrupt transitions. Use the blur tool to make the edges blend smoothly.
Pay attention to which layer you have selected when you go to use the blur tool. You need to select the layer that contains the pixels you want to blur.

Comments