Learning Effects – Part 3
Learning Effects
Before we apply another effect, click on the first state in the History palette before the Asphalt effect, and then choose Clear History from the History palette menu (click on the little arrow in the palette’s upper right corner to access the menu).You don’t have to clear the history, but it’s more orderly.
You do need to step back before the Asphalt effect, to undo it and start with a clean image. If you ever get confused about which state was before an effect, or if your image gets changed in a way that you can’t seem to undo, close your image without saving, and reopen it. History states are not saved, so you’ll have a clean History palette when you reopen.
The Brushed Metal effect requires text, so select the type tool in the toolbar, and add one word, 50 pt or larger. You need to have your text layer selected in the Layers palette before choosing the Brushed Metal effect, and clicking the Apply button in the Effects Browser.
Make sure you choose Brushed Metal, and not Brushed Aluminum, which is right next to it in the list.
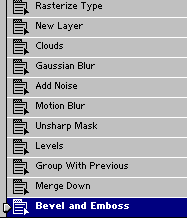
As we did with Asphalt, after you accept the effect, I want you to go back to the last history state before you applied the effect, and then walk forward, looking closely at what happens in the image, and in the Layers palette as you click on each subsequent state.
Watch closely when the first step, Rasterize Type, occurs. Type, in Elements and Photoshop, is created from from vector outlines. In order to apply filters to type, you have to first change it into a regular, pixel shape (an image).
In Elements, the command is called Simplify Layer, and not Rasterize, but you can see what it does by watching your Layers palette as you click on the Rasterize Type state.
The next series of states add a new layer, and then proceed to apply five filters to it. If the filter names are all new to you, please see the Appendix for help.
The Levels state adds contrast to the image. Levels can be applied either directly (as it is here), or as an adjustment layer. It alters the tonal range of your image, and is generally used for increasing contrast.
Then we come to the Group with Previous command. As promised when we saw this with the previous effect, I’ll explain what it does, this time.
Step back and forth between the Levels state and the Group with Previous state. Can you see what Group with Previous does?
It limits the visibility, and effects of the top layer to those areas that have content in the bottom layer. The boundary of the shape on the bottom layer determines what you see, and don’t see from the layer above.
When it was used in the Asphalt effect, the bottom layer was fully opaque, so the grouping effect was not particularly apparent. It should be much easier for you to see what it’s doing, here.
Next step is Merge Down, to combine, permanently, the two grouped layers.
And, the last state applies a Bevel and Emboss to the type. This is interesting because Elements doesn’t have a bevel and emboss style. You can apply a bevel, or you can apply an emboss, but not both.
You could apply a bevel style, and then use Filter > Stylize > Emboss, but the filters are not removable as are styles.
What you can do, is copy the style from this effect by choosing Layer > Layer Style > Copy Layer Style. To apply it, select a layer (which can be in another document) and choose Layer> Layer Styles > Paste Layer Style.


Comments