
Halftone custom photoshop shape
This tutorial is going to show you a way to create halftone custom adobe Photoshop shapes. These shapes can be used in many design projects like logo design, flyer design or even as a background for another design element. They are very versatile because of their vector nature which means that they can be used at any size. Here are a few examples.

Let’s start
1) Create a new document. For this tutorial it is necessery to work on a very large file to have good results so I used a size of 3000*3000 pixels
2) Choose the custom shape tool
Make sure you have Paths Selected
3) Choose a custom shape that you want to transform to a halftone photoshop custom shape. For this tutorial I used this flower like shape.
4) Hit “P” to select the pen tool, right click on the shape and select “Make Selection”. Then go to “Select” -> “Inverse”

5) Hit “Q” to ener quick mask mode
6) Go to “Filter” -> “Pixelate” -> “Color Halftone” and use these settings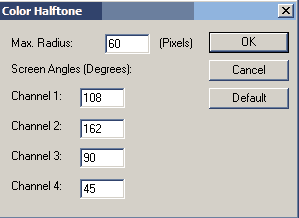
You can Change the settings depending of the shape and the result you want to achieve
7) Hit “Ctrl-F” a few times until you are happy with what you see
You should now have something like this
8) Hit “Q” again to exit Quick mask mode and go to “Select” -> “Inverse”
9) Select the paths tab and delete the path that is there. Then click on the “Make work path from selection” button (see image below)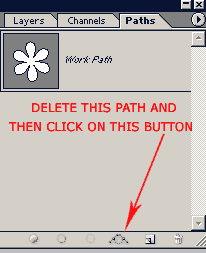
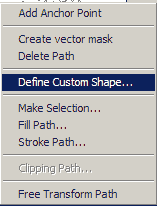
10) Make sure you have the Pen tool (P) and right click on your image and Select “Define Custom Shape”
Give your shape a name and you have a new Halftone Photoshop shape that you can use at any time and at any size. (Don’t forget to save the new shapes you create because the next time you will reset your shapes they will be lost)
My final result.
Comments