
3D-Photo effect
In this tutorial I will try to explain how to create a
3D effect from a 2D-image
|
|
|
|
1. This is the original image
|
|
|
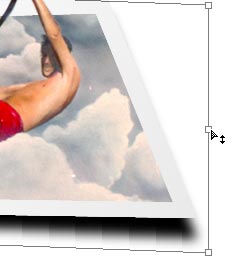
2. Start with creating the “Photo-frame” by drawing a selection with the Polygonal Lasso Tool (L). Save the selection as “frame” 
|
|
|
3. Now, mask the details that is outside the frame you created in step 2.
4. Creating the Photo frame Now, load the selection “frame” and then load the selection “innerframe” and chose subtract from selection, an d it will look something like this. 5. Add a new Layer and fill it with a gradient white to light grey. White top left to light grey bottom right. 6. Creating a shadow.
7. Now go to edit > transform > skew and drag it down a little bit on the right side.
8. Set the opacity to about 60%
9. Now, fill the bottom layer with any color you like and you’re done!
|
|


Comments