
Background Masking Techniques in Photoshop part 1
The Magic Eraser Technique

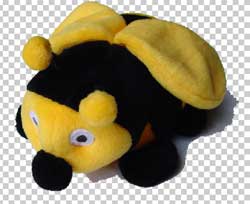
The Magic Eraser tool (hold down the Eraser icon in the toolbar to access it) allows you to erase pixels that are all the same color (or are a similar color). If you used the Magic Eraser tool at its strictest setting, and clicked on a part of the picture that was orange, every other pixel in the picture of that exact shade of orange would be erased. We’ll use the Magic Eraser tool to erase the whites and greys in this photo.
First, we’ll change a few of the tool settings. By increasing the Tolerance, the Magic Eraser tool will erase “similar” colors as well (whites/greys). By checking the “Contiguous” box, the Eraser tool will only grab pixels of similar colors that are next to each other — that way, I won’t accidentally erase the whites of the bee’s eyes.
![]()
My first pass is set to a Tolerance of 72. I click outside of the bee, in the “white” area. After only one click, Photoshop erases most of the background in the picture – not bad! If the Tolerance is too high, you might inadvertently grab some bits of the object as well. If that’s the case, just Undo and try a slightly lower Tolerance level.

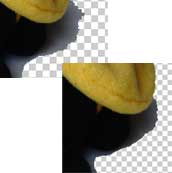
For my next few passes, I set the Tolerance to 32, and use the Magic Eraser tool a few more times in the grey “shadow” areas. In the diagram below, the left image shows the shadow before I used the Magic Eraser. The right image shows how a bit more of the shadow is erased with a single click of the Magic Eraser!
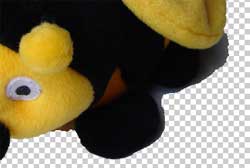
Unfortunately parts of the shadows are so dark that trying to use the Magic Eraser would end up erasing some of the black parts of the bee as well. So I stop using the Magic Eraser at about this point:
From this point on, I switch to the “normal” Eraser tool and set it to Brush mode. I zoom in and erase the shadow portions by hand. I also create a new layer underneath this one, and fill it with red (or any other contrasting color) so that I can see the “smudges” that were missed by the Magic Eraser. Then, I use the Eraser tool to wipe those out as well.

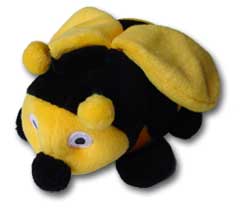
For the final touch, I add a drop shadow just to make the bee “pop out.”
Here’s the summary:
Magic Eraser Technique:
- First pass using Magic Eraser Tool: 72 tolerance, contiguous, anti-aliased.
- Second pass using Magic Eraser Tool: 32 tolerance, other settings same.
- Used Eraser tool (brush mode) to clean up edges, stray pixels, and shadow area.
My take: This technique makes it easy to isolate objects that are on solid-colored backgrounds, although you may need to spend some time with touch-up. Beware of stray pixels and forget about using this technique if you have a multi-colored background!
Comments