
Working in the Photoshop CS Camera Raw Dialog Box
All professional and many mid-range digital cameras support the capability to capture images in the RAW file format. Each manufacturer takes a different approach to doing so, but for the most part, the editing of these files can be done fairly painlessly in Photoshop CS(or Photoshop 7 if you have the Camera Raw plug in). Today we’ll take a look at the Photoshop CS Camera Raw Dialog Box and what tweaks you can make to your images using the two modes of Photoshop CS Camera Raw; Basic and Advanced. The Camera Raw dialog box gives you the capability to quickly edit images that are in the RAW file format. When you do edit them in this format, you retain all the original image data that was captured by your camera’s image sensor or CCD. Unlike with JPEG, no filters or any adjustments are made by the camera when captured in this format.
JPEG Issues
As digital camera became more powerful and more professionals turned to the format for capturing images, there had been one issue with image quality, and that is the use of JPEG as the standard file format for capturing and transferring images to the digital camera’s memory card. JPEG is a format that is understood by all browsers, is easy to read by all image editing applications, is relatively compact in size and to the naked eye, can look high quality. However, because JPEG is a compressed format (lossy), and such tweaks as white balance, gamma, sharpening, and saturation are processed in the camera, image quality is on a constant path to degradation, a feature to the file format that is not acceptable by professionals. In the film world, professionals are accustomed to working with a negative, scanning it into a computer at the highest resolutions possible and then manipulating it. The RAW file format is a lossless format, meaning no image data is thrown out and is as close to a digital negative that you are going to get. The format retains all the image data captured by the digital camera’s imaging sensor or CCD, which is the total opposite of the JPEG format.
With Photoshop CS, RAW format support is built in. To open a RAW format image inPhotoshop CS, you simply launch the file browser, click on a RAW image, and the Camera RAW dialog box opens, which enables you to tweak various aspects of the RAW image file.
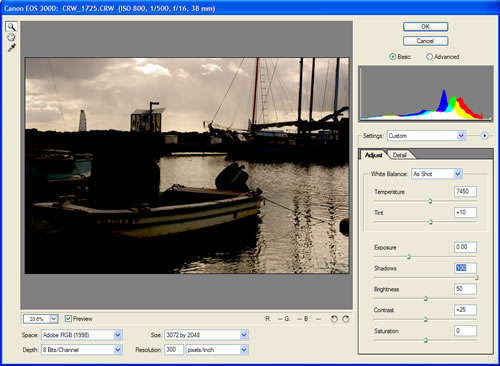
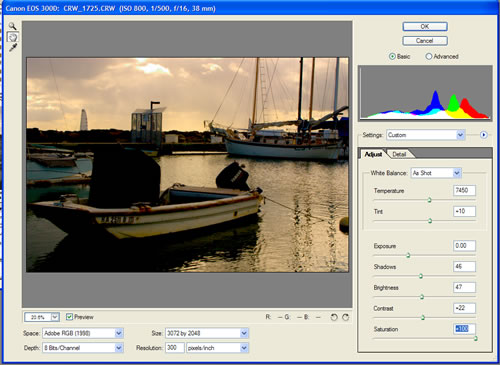
In Basic Mode, the hand tool, zoom tool and white balance tool are located in the upper left corner of the window. This window gives you access to a variety of sliders and drop down menus. Starting from the bottom left, you can change the size of the image in the window, as well as turn the preview on or off.
Color space support includes the capability to change from Adobe RGB 1998 to ColorMatch RGB, ProPhoto RGB, and sRGB IEC61966-1. Bit depth can be changed from 8-bits per channel to 16-bits per channel.


The size of the image can also be altered here. Your choices include 1536×1024, 2048×1365, 3072×2048, 4096×2731, 5120×3413, and 6144×4096. Image resolution can also be manipulated here as well, as is the capability to rotate the image clockwise and counter-clockwise.
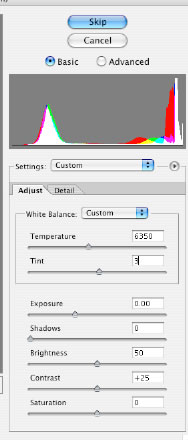
The bottom right of the window features two tabs; Adjust and Detail. See image above. Under the Adjust tab, you can change the White balance. Your choices for White Balance adjustment include As Shot, Auto, Daylight, Cloudy, Shade, Tungsten, Fluorescent, Flash and Custom. Under White balance is Temperature and Tint.
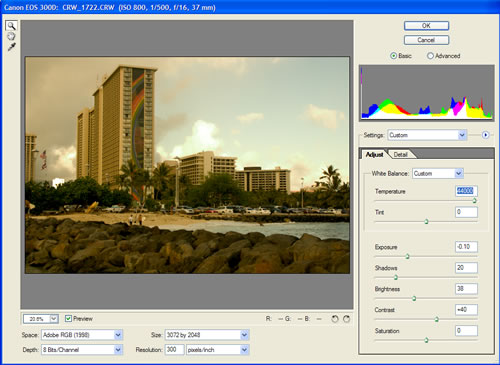 |
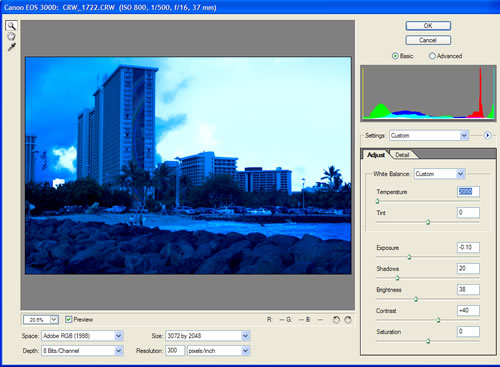
Inputting a lower numerical value in the Temperature setting (or moving the slider to the left) will add more blue to your image, inputting a larger numerical value (or moving the slider to the right) will add more yellow to the image. Sliding the Tint toggle to the left (or inputting a negative numerical value) will emphasize the green color in the image, while sliding the toggle to the right will emphasize the image’s red colors. Below Temperature and Tint you’ll find Exposure, Shadow, Brightness, Contrast and Saturation.
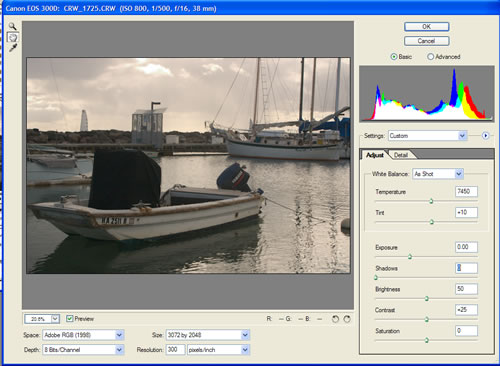
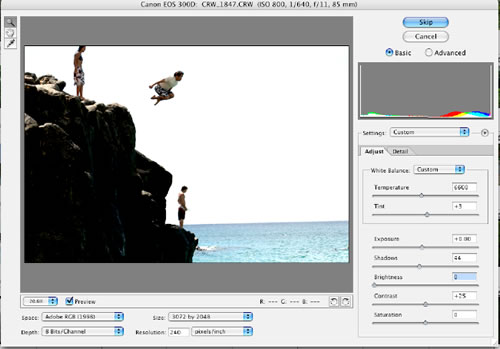
You can tweak an image’s exposure with the Exposure tool. Send the slider all the way to the left and you’ll experience a darker image. Boost the slider all the way to the right and you’ll see a more overexposed image.
 |
Shadows will alter the darker areas of an image. Set the slider to 0 and you’ll see a minimum manipulation of the darker areas of the image. Send the slider all the way to the right and the darker areas of the image will become more pronounced.
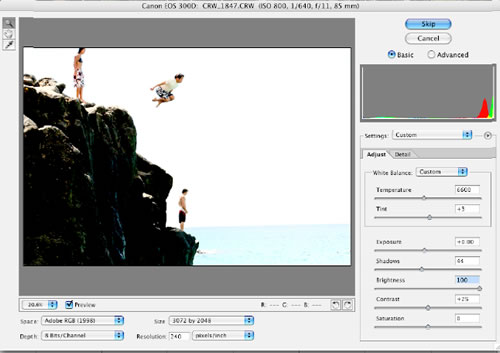 |
The Brightness slider will add more or less brightness to an image. Contrast slider will enable you to add or subtract contrast in an image, and Saturation can change the saturation in your image. Take the slider and move it all the way to the right, and the image is more saturated, so much so that the water and the clouds in the sky look very similar in color thanks to the reflection of the orange from the sun.
 |
| Contrast |
To me it seems similar to a photograph printed on glossy paper compared to the same photograph printed on matte paper. The next tab under Basic is the Detail tab, which gives you access to Sharpness, Luminance Smoothing, and Color Noise reduction sliders.
 |
| Calibrate tab |
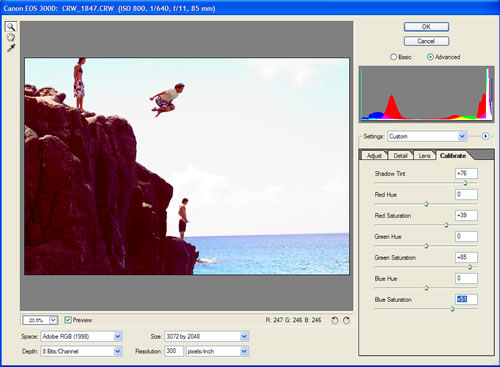
Clicking on the Advanced radio button adds the advanced Lens and Calibrate tabs. The Lens adjustment sliders are accessed when certain specific issues arise that are associated with the lens that was used to capture the photograph. The sliders include Chromatic Aberration R/C (red, cyan) and Chromatic Aberration B/Y (blue, yellow), Vignetting amount and Vignetting Midpoint. Chromatic Aberration is a common occurrence in photographs taken with digital cameras. Purple banding where there is no purple color is often the result of this. The Chromatic Aberration sliders are used in this case to help alleviate this issue.
Vignetting, which is a darkening of the corners of an image, often occurs with the use conversion lens and close up lens. You can use the vignetting sliders to add light to the edge of an image to help compensate. First select the vignetting amount and then the vignetting midpoint.
The Calibrate Tab includes a set of sliders for adjusting Shadow tint, Red Hue, Red Saturation, Green Hue, Green Saturation, Blue Hue, and Blue Saturation. In the image below, the original image is a bit washed out with little saturation, almost a black and white looking image. The image below that includes adjustments made under the calibrate tab.

Once you make your adjustments within Photoshop CS’s Camera Raw dialog box, you can click ok and the image will open up, as a RAW file, in Photoshop. When you click ok from within the Camera Raw dialog box, all the changes will take place to the RAW image file. You can make further refinements if you wish using Photoshop CS’s other tools and then save it out in another file format. If you have multiple shots taken under the same lighting conditions, and you want to apply the changes you made in one image to all the images, you can select Previous Conversion, located under the Settings box, and Photoshop CS will apply those changes to the other images.
So there it is. The Photoshop Camera Raw dialog box has many of the familiar tools in Photoshop that enable you to edit images in the RAW format, so you can tweak most all aspects of the image’s attributes without compromising the quality of the image.
Comments