
Creating business cards in FreeHand
June 15, 2006 | 0 comments
Making business cards in FreeHand
There are many choices in perforated business card stock available on the market. Here are instructions and helpful hints on using those products. Most commonly these products are an 8.5″ X 11″ page with perforations that allow you to have a total of ten cards per printed page.
Follow the steps below to create a template of rectangles:
- Start FreeHand and choose File > New to open a blank document.
- In the Document Inspector, choose a page size that matches the size of the card stock that the business cards will be printed on. This example uses standard 8.5″ x 11″ perforated card stock.
- Choose View > Snap To Point and View > Guides > Snap To Guides to enable snapping.
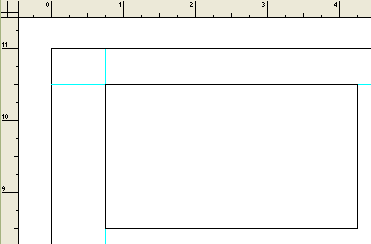
- With a ruler, measure from the left side of the card stock to the left edge of the card perforation.
- Drag a vertical guide onto the FreeHand page and place it at that position.
- Measure from the top of the sheet to the top edge of the top card, and drag a horizontal guide onto the page at that spot.
If unsure whether or not the guides are in the right place, double-click one to open the guides editor, and edit if necessary.
- Draw a rectangle with measurements that match the size of the card (for our example, the size should measure 3.5″ x 2″) and give it a 1 point black stroke. Check the Object Inspector to make certain the width and height are correct.
- Drag the rectangle with the arrow tool and snap it to the upper left corner where the guides meet.
- Drag another horizontal guide and snap it to the bottom edge of the rectangle. Check the guides panel to make sure it lands in the right place.
- Select the rectangle and drag it downward. When it starts to move, press and hold the shift and alt/option keys. This constrains the movement to vertical only, and creates a copy of the object. When you see it snap to the guide, release the mouse button and check the Object Inspector to make sure it’s in the right place.
- Without deselecting, choose Edit> Duplicate three times to power-duplicate it vertically down the page.
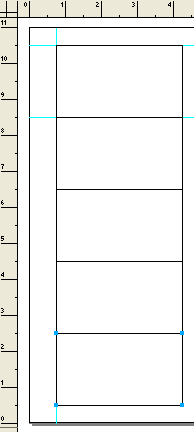
- Drag out a new vertical guide and snap it to the right edge of these rectangles.
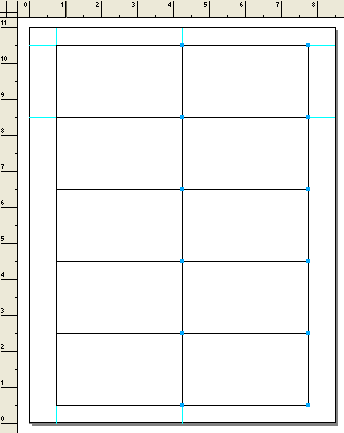
- Select all of the rectangles and drag them to the right, holding down the shift and alt keys (Windows) or shift and option keys (Macintosh) until they snap to the new vertical guide. Your rectangle template is now complete. This will let you adjust the location of the card contents without wasting a sheet of card stock.
Adjust the template to match the card stock:
- Print the page to a piece of plain paper. Hold this paper and the card stock up to a strong light to see where you need to move the FreeHand objects to make them line up with the card perforations.
- To move the template of rectangles on the page, either nudge them with the arrow keys on the keyboard, or use the Move subsection of the Transform panel. Open the Transform panel to the Move subsection.
- Select all of the rectangles, and enter the necessary distance in the dialog boxes. While you have the Move panel open, make sure there is a check mark next to Contents.
- Print the page again to a piece of plain paper. Hold the paper and the card stock up to a strong light to see if the rectangles now line up with the card borders. If they do not, repeat these steps until they are correct.
Apply the business card contents to the template, and print:
- Now that everything is in place, delete all the card boxes except for one.
- Turn off Snap to Points.
- Place your card design in front of the rectangle in the position that you wish it to print.
- Select the design, and choose Edit > Cut.
- Select the rectangle and choose Edit > Paste Inside (Edit > Paste Contents in FreeHand MX).
- Set the stroke of the rectangle to None.
- Duplicate that rectangle to create ten cards, using the same steps illustrated earlier. Use more guides if desired.
- Print this page to plain paper one last time and check it against the card stock in strong light. If all looks correct, print a copy on the card stock.
Additional information
There are two alternate ways of duplicating the cards the extra 9 times:
Lens fill method
- Leave the original place holder boxes in place that were involved in the template setup.
- Select nine of the ten boxes, leaving the top left box as the un-selected box.
- Apply a Lens fill with the attributes shown below.
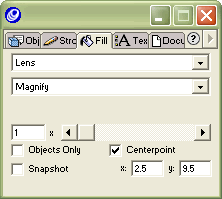
Note: You may need to tweak the center point number to match your specifications.
- Set the stroke to be none.
Note: The art work must be sent behind the boxes with the Lens fills, in order for the duplication to function correctly.
Brush method
- Define a Brush using the art work for the business cards. Include a box with no stroke or fill the size of the card. See the FreeHand User manual for more information about creating a brush.
- Drag a copy of the brush to the template.
- Using the above “power-duplicate” method to duplicate the 10 copies of the brush on the template.
Comments