
Strokes, fills and blends
|
Some of you may be wondering about the benefits of using FreeHand to draw versus using Macromedia Flash. You may be thinking, ” I can draw perfectly well in Flash.” Maybe you can; maybe you’re the Rembrandt of Flash. But there are things that FreeHand can bring to the creative process that you just can’t do in Macromedia Flash. Have you ever tried to draw an acute-angled eight-pointed star in Flash? How about a mollusk shell? No? Macromedia Flash has a very good drawing engine and the addition of a Bézier Pen tool and the Fill Transform tool to Macromedia Flash MX, shown below, makes this process easier: |
||
As a matter of fact, both of these tools have been borrowed directly from FreeHand But FreeHand has been around for a long time and its drawing tools are sophisticated. You can use FreeHand to draw just about anything. FreeHand brings two things to the process: the ability to create sophisticated objects such as multisided polygons, stars and starbursts, quick and dirty triangles, and the world’s coolest spirals in any possible variety of shapes; and the ability to apply strokes and fills to those objects. Once you’re comfortable with FreeHand’s “release to layers” feature, you can build animations of these complex images in FreeHand for use in Macromedia Flash MX. |
||
|

|
||
|
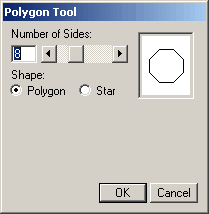
Suppose you need to create a stop-sign image for a Macromedia Flash project. How would you ever draw an octagon in Flash MX? FreeHand 10 makes this simple. Double-click the Polygon tool, click the Polygon option button and enter 8 (sides):
Just Shift-click and drag on the page to draw the stop sign. As you can see, this is the same method used to create stars in FreeHand (although when you select the Star button you are given more options). Add text, color and shading, and then save the file as a FreeHand 10 file. In Macromedia Flash MX create a new symbol and import the FreeHand file directly into the first key frame of the symbol. There’s a bit more to the importing part than just this, which you’ll see in the next example. |
||
|
|
||
|
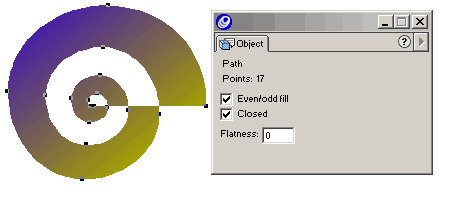
In FreeHand 10 use the spiral tool to draw a basic spiral. (Double-click the spiral tool to set the spiral options before drawing the path.) For this particular example, I’ve closed the spiral using the Object Inspector and given it a gradient fill between two RGB colors (see my section later on color conversion) and no stroke: For a working example of some of the steps following, open the file: spiral_blend_source_files.FH10 from the folder of downloaded sample files.
|
||
 |
||
|
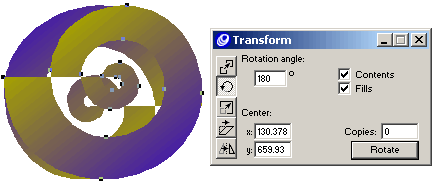
Clone the spiral so that you have two of the same. Select only the clone. Open the Transform panel. Enter 180 (degrees) in the Rotation field and click the Rotate button. Your drawing will look similar to the one below:
|
||
|
|
||
|
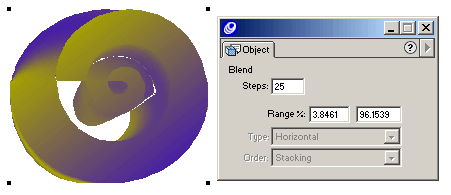
Now for the fun part. Select both images (either Shift-select or marquee-select). Choose Xtras > Create > Blend. This will create a blend between the two spirals. If you’ve never done blends before, you may want to go back and read a bit in the FreeHand manual to make sure you know what to expect. At this point, it’s a good idea to adjust the number of steps in the blend, as shown below. (Later you’re going to use each step in the blend as an animation layer, so having too many steps may make too may layers and increase the file size of the resulting SWF.)
|
||
 |
||
|
The blend should still be selected, so choose Xtras > Animate > Release to Layers. The Release to Layers command is well documented in the FreeHand manual and online help, so I won’t explain it all here. Basically, it takes the blend apart and puts each blend step on its own layer. There are several options available. For this example, choose Build in the Animate pop-up menu. Every Animate option provides slightly different results when imported to Macromedia Flash, so try out several. Note: FreeHand 10 has the ability to test an animation in the Flash Player. Before saving, choose Control > Movie Settings to adjust the frame rate of the animation; then use Control > Test Movie to see what it looks like in the Flash Player—all while still inside FreeHand At this point you can save the FreeHand file for importing into Flash or use File > Export to create a SWF of the animation directly from FreeHand 10. You can then load that SWF into an existing Flash application using the loadMovie or loadMovieNum actions. |
Comments