
Macromedia Flash Animation – Bitmap Blur Method
Bitmap Blur Method
This blur method achieves the same effect and is useful with more complex images. It requires that you export the image you want to blur as a bitmap and use a graphics editor, such as Macromedia Fireworks or Adobe Photoshop to apply a motion blur.
Figure 9. Example of the bitmap blur method
- Open the blurEffect_bitmap.fla file (located in the sample files you downloaded) and save it with a new name. I have supplied you with an example character to use for this technique.
-
Create a motion blur of the character coming into view. Although you could use a simple linear gradient like you made in lesson one again here, instead you are going to try to maintain some of the complexity of the character in the actual blurred graphic. To do this, you must export this character from Flash as an uncompressed bitmap. Select File > Export Image and select PNG (*png) as the format in the pop-up menu at the bottom of the Export Image dialog box. Give your image a name such as unblurred.png and click Save. The Export PNG dialog box will open, prompting you to make some choices. For the resolution, type 72 dpi, select Minimum Image Area in the Include pop-up menu, and most importantly, select 24 bit with alpha channel in the Colors pop-up menu. This will make the background area around the character transparent (assuming your Flash document does not have an actual fill color or other type of graphic on another layer). Click OK.
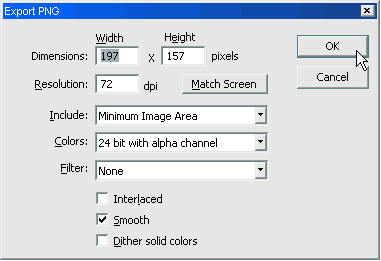
Figure 10. Export PNG dialog box with appropriate settings

-
Open your graphics editor. For this example you will use Fireworks. Once your unblurred.png file is open it should look like Figure 11:

Figure 11. Bitmap sample file, unblurred.png
The checkerboard background represents the alpha channel you included when you exported from Flash. This area is transparent and is necessary later on when you import it back into Flash after you modify it.
-
You must increase the width of the canvas of your document to compensate for the motion blur you are going to apply. In Fireworks, select Modify > Canvas > Canvas Size. The Canvas Size dialog box opens. In the width input area type in 400 Pixels. This will increase the width of your canvas and allow for room on either side of your character to apply the blur effect.
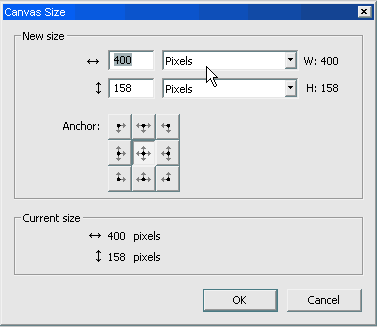
Figure 12. Canvas Size dialog box
-
Now for the fun part: Select Filters > Blur > Motion Blur.

Figure 13. Opening the Motion Blur dialog box from the Blur menu
In the Motion Blur dialog box, set the Angle to 0 so that the blur effect is horizontal.
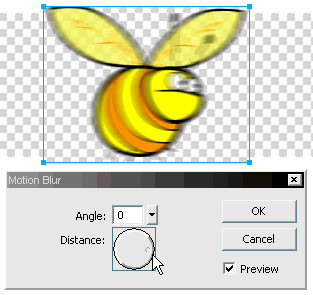
Figure 14. Setting the blur angle to 0
Adjust the Distance slider to 85 to 100, depending on the amount of blur you want.
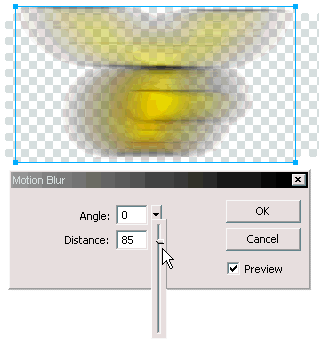
Figure 15. Adjusting the Distance slider to 85
-
Crop your document as close as possible to the image to avoid adding unnecessary bytes to your file size.

Figure 16. The Crop tool
Select the Crop tool (C) and crop your Stage by clicking and dragging the crop marquee around your image. Use the handles to adjust the amount you wish to edit out of the document. Try to get as close as possible to the image without cropping the image itself. Select File > Export Preview. Select PNG 32 from the Format pop-up menu. Click the Export button and name the modified image blurred.
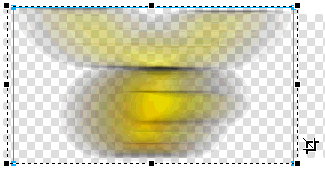
Figure 17. Cropping the image
-
Go back to your Flash (FLA) file and create a new layer. Select File > Import and navigate to blurred.png, select it, and click OK to import it. Your blurred image appears on the Stage. Select it with the Selection tool (V) and convert it to a symbol (F8). Position the blurred image so it’s directly over the original vector graphic.
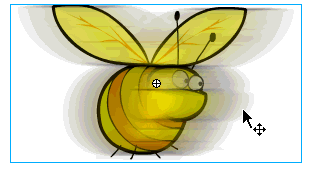
Figure 18. Blurred image positioned over original vector graphic in Flash
-
Extend the Flash Timeline by clicking Frame 30 and insert frames (F5). Do this for both layers. Then click to select the keyframe in frame 1 of the original vector graphic and drag it to Frame 10. Your Timeline should now look like Figure 19:
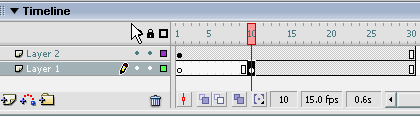
Figure 19. Timeline with new frames extending to Frame 30 and with the original keyframe for the vector graphic moved to Frame 10
-
Select the keyframe in Frame 1 of your blurred image and drag it to Frame 8. Select the instance of the blurred image symbol and use the arrow keys to nudge it all the way to the left so it remains partially visible on the Stage.
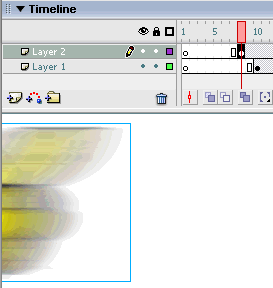
Figure 20. Timeline with Frame 8 of the blurred image symbol layer selected. Note that the blurred image has been nudged to the left side of the Stage.
- Select Frame 9 and create a keyframe (F6). With the same instance selected, use the arrow keys to nudge it back towards the original nonblurred vector image. Select Frame 10 of the layer with the blurred symbol instance and create a blank keyframe (F7). This will remove the instance from the Stage, leaving only the original vector graphic visible. Play back your animation.
Summary
You’ve just learned two techniques of how to create stunning motion on your Flash movies. These examples were designed to give you basic understanding of how to create this effect. Feel free to push the envelope even more by playing around with different frame rates and varied amounts of blurring of the same bitmap. You can even try applying effects to the instances as well. The fact is, the sky is the limit in terms of exploring new techniques with Flash.
Comments