
PageMaker 7.0 Basics
PageMaker Basics
PageMaker is designed to work most effectively as a page layout program. It is excellent for documents with complex formatting and/or multiple pages, such as newsletters, resumes, reports, and handouts. The PageMaker window contains multiple elements to make creating a document easy.
This document concentrates on the fundamentals of using PageMaker. Basics such as opening PageMaker, creating a file, saving, and printing will be addressed. This document will provide you with a foundation for building your PageMaker skills.
 Opening PageMaker
-
From the Start menu, select All Programs » Graphics » PageMaker 7.0 » Adobe PageMaker 7.0
NOTE: Due to periodic Start menu reorganization, the location of programs may be altered.
Opening an Existing PageMaker Document
Once you have closed a document, you can always reopen it at a later time and make changes or additions. With PageMaker open and running on your machine:
-
From the File menu, select Open…
The Open Publication window appears. -
Using the Look in pull-down list and navigation window, select the file you wish to open
You may have to change drives and folders to find the file if it does not already appear in the list box.
-
Click OPEN
Creating a New Document
- From the File menu, select New…
The Document Setup dialog box appears.
-
Make the appropriate changes in the Document Setup dialog box
NOTE: For information on available options, refer to About the Document Setup Dialog Box. -
When done, click OK
PageMaker will open a new document according to your Document Setup specifications.
About the Document Setup Dialog Box
The Document Setup dialog box allows you to determine what your document will look like.
Setting margins, page size, number of pages, and starting page
In PageMaker, the standard margin settings are (in inches): inside (left): 1.0, outside (right): 0.75, top: 0.75, bottom: 0.75. You can adjust them to fit your needs.
Setting page dimensions
Standard page dimensions are 8.5″ x “11” for letter size paper. Change the dimension in the selected box by typing in a new number. Select a different box by pressing the [Tab] key or clicking the desired box.
Determining page orientation
The page may be Tall or Wide in orientation.
Adjusting the number of pages
Change the number of pages by typing the appropriate number in the Number of pages text box.
Other Options
Pages can be set up as single, double-sided or facing. (Pages cannot be facing unless they are double-sided.) For single-sided pages, there should be no options selected. The following descriptions should help with your decision making:
Single-sided
Pages show only one page at a time on the screen and only one master page is created.
Double-sided
Pages also show only one page at a time on the screen. However, two master pages are created. This option is appropriate for publications that will be printed on both sides of a page.
Facing
Pages display two pages at a time on the screen (except page one, which is displayed alone). This selection is appropriate if you are setting up a magazine or booklet, because the pages are set up to face each other, just as they would in a book.
Saving a File Using Save As…
PageMaker allows you to save your document as a publication, a template, or it will save a copy of your PageMaker 7.0 document in a 6.5 format. Saving a document in an earlier version allows you to share files with others who do not have the same version of PageMaker as you.
Saving for the First Time
Save As allows you to name the file. Do not panic if you choose the Save option instead of Save As the first time you save your document. PageMaker will always generate a Save As dialog box if you are attempting to save an untitled document.
Saving under a New Name
If you want a copy of your file saved with a new name use Save As to rename the file. The original-titled document will remain as it was after the last save. The new file name will appear in the title bar and any additional saves will be to the new file.
Saving as a Template
If you want to save your formatting for use in subsequent documents, use Save As to save the file as a template. For more information, refer to Creating a Template.
Compacting a Large File
If a large PageMaker document is taking up too much disk space, choose the Save As option but do not change the document’s name or location. PageMaker will ask if you want to replace the existing file with the same name. Click YES. The file will essentially reorganize itself on the disk and take up less disk space.
Using Save As…
Use the Save As option to save a file for the first time, to save a file under a new name, or to compact a file.
-
From the File menu, select Save As…
The Save Publication dialog box appears.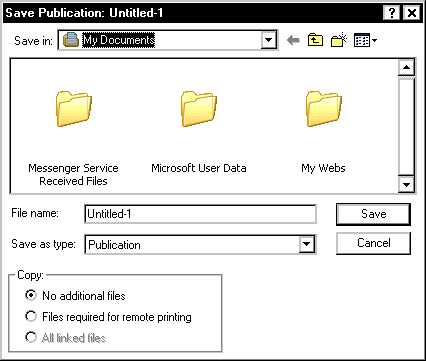
-
Using the Save in pull-down list and navigation window, navigate to the desired save location
-
In the File name text box, type the name of the file
-
To save as a template or as a different version, from the Save as type pull-down list, select the desired file type
-
When you are finished, click SAVE
Using Save
Use the Save option to save additional changes to a file that has been previously saved.
-
From the File menu, select Save
NOTE: PageMaker will save changes made since the last save. A watch or an hour glass will appear on the screen indicating a Save is in progress. Once the file has been saved, the last tool you were working with will appear on the screen and you can continue working.
Exiting PageMaker
You can exit PageMaker completely or simply close the document you are working on while remaining in PageMaker.
To Remain in PageMaker after Closing
-
From the File menu, select Close
NOTE: If you forgot to save your document, PageMaker will ask whether you want to save the document before closing - To save,
- Click YES
- Using the Save in pull-down list and navigation window, select the desired save location
-
Click SAVE
-
To close without saving, click NO
To abort the close request and return to the document, click CANCEL
To Exit the Document and the PageMaker Application
-
From the File menu, select Exit
Comments